• I’ve decided to bite the bullet, and start a general discussion thread for this game.
    Post your strategies, house rules, balance fixes, etc. – anything goes! :)
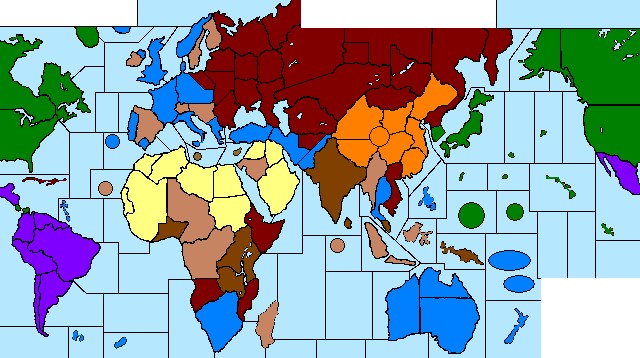
    East&WestMap.gif
    Some info can be found here:
    https://boardgamegeek.com/boardgameexpansion/6441/east-west-global-war-1948

    Update: 2022-10-18
    If you want to play East & West, message me via the forums or post in this thread, to get a copy of the rules.
    The Imp Games E&W FAQ (clarifying some of the rules) can be found using this link:
    http://web.archive.org/web/20161026001604/http://impgames.com/FAQ.html

    You can also use the MotCreations MapView utility to help with PBEM/PBP games of E&W; download it here:
    http://www.motcreations.com/


  • (I’ll get the ball rolling ;) )
    Balance Fix: reduced starting forces for NATO

    As I’ve been strategizing and theorycrafting a bit, one thing I’ve noticed is that the UK and the US both start with a lot of infantry. What this means is that, even with their transports being spread somewhat thinly across the map, they can usually keep them filled every round – the starting infantry on Japan and the UK home island come to mind, but also that India stack never gets any smaller… :/ Without needing to spend much on infantry in the early game, this negates a lot of the benefit of the USSR having cheaper infantry.

    What I am thinking of implementing is an across-the-board reduction in the number of starting infantry for NATO, as follows:

    • territories with more than 1 WE infantry start with 1 less WE infantry (France, Italy, Norway, West Germany, Greece, Turkey, Indochina)
    • territories with more than 1 UK infantry start with half as many UK infantry (UK, West Germany, France, Iceland, India, New South Wales, South Africa)
    • territories with more than 1 US infantry start with 1 less US infantry (East US, West US, West Germany, Italy, Iceland, South Korea, Japan, Philippines)

    This would be an overall change of:

    • 21 WE infantry (down from 28)
    • 22 UK infantry (down from 33)
    • 25 US infantry (down from 33)

    Since this would also shave down the number of infantry already on the European continent for NATO, it could potentially remove the necessity for a “bid” (or the default of 20 IPCs for the Soviets, on round 0.) For example, I generally find that the USSR needs to max out their round 0 placement on Georgia and North Korea, if they plan to attack Turkey and South Korea (respectively); the need for these extra attacking infantry might be mitigated by this proposed reduction in the defending forces. Likewise, removing 3 NATO infantry from West Germany might make an extra 7 Soviet infantry (between East Germany and Poland) less necessary for the round 1 attack.

    For WE in particular, this makes their starting position a little tougher. Having less infantry in Italy and France means that attacking Yugoslavia or Greece on round 1 runs the risk of spreading them too thin. It also makes it harder to stack Norway – which is normally a distracting nuisance for the Soviets. The loss of 1 infantry from Indochina probably doesn’t impact their overall strategy, but it does potentially weaken the India stack.

    In a similar vein, a previous balance fix I had suggested way back in the day, was to remove any starting NATO fighters from territories with a value of 2 IPCs: Iceland, Greece, Indochina, New South Wales and South Korea. This would reduce the total number from 16 down to 11, compared with 7 for the Soviets. Admittedly, two of these NATO fighters would be destroyed in West Germany right out of the gate. (A compromise might be to only remove the fighters from those territories that do not also contain an armor unit.) However, NATO would still have an edge in this department, and I feel that the mobility and defensive capability of these fighters is something that needs to be curtailed – it is far too easy for them to be redeployed across the map, to stymie Soviet offensives wherever they may come.


  • @The-Janus Looks interesting. Not read the rules or set up, as yet. I presume that can be found there too. (Was in a rush.)


  • Can we also discuss Great War? I could contribute more in that regard.

    I will try to dig up my copy of east west


  • @Imperious-Leader said in "East & West" by Imp Games - Discussion:

    Can we also discuss Great War? I could contribute more in that regard.

    I will try to dig up my copy of east west

    I never played it myself, but I followed the old discussions and know some of the mechanics…ish; I don’t mind having TGW discussion in here as well. :)

    I actually (albeit uncredited) was the one who proposed the revised turn order, which was adopted as part of the major revision (1.1? I want to say?) Did they also revise the starting setup a bit? If so, I don’t think that would be reflected in the MapView version…

    I might have the rules for TGW saved somewhere; I’ll try and dig them up.


  • Yes dig those up. the turn order was i think

    Russia
    Central powers
    Entente
    ?


  • @Imperious-Leader said in "East & West" by Imp Games - Discussion:

    Yes dig those up. the turn order was i think

    Russia
    Central powers
    Entente
    ?

    I believe the original turn order was:
    Germany->France->Austria->Russia->Ottoman->UK
    The revised turn order became:
    Austria->Russia->Germany->France->Ottoman->UK

    If I’m remembering correctly, the Russians were getting beaten down by the CP in the old turn order; the fix was to make it so Germany and Austria weren’t both going before them, and have the turn order (sort of) more closely follow the historical order of war declarations (but still alternating turns between the two factions.)


  • Custom Scenario: Cold War (circa 1975) for East & West

    Context:
    Back in the days of A&A: Iron Blitz for the PC, one of the custom scenarios I came up with for that game, was a Cold War variant. I started off with having EU/NATO (as well as Commonwealth countries) with their capitol in the UK, allied with the US. On the opposing side was the USSR/Warsaw Pact (including Cuba) allied to a coalition of China and the Arab League (with it’s capitol in Japan, for mechanical reasons related to the PC version – the “fiction” I had invented was that they invaded Japan, which was the catalyst for the war.) This was probably/possibly/partly inspired by Command & Conquer: Red Alert 2 being out around this time, and having Iraq and Libya as factions under the Soviets.

    Around the same time, East & West was out; when I found out about it, adapting this scenario to it was one of the first things I had thought of. I had been refining the idea, and doing more research into the historical context of the period. Here’s what I eventually came up with:

    recolourjpg.jpg

    Whereas the “Berlin Airlift” scenario (of the original E&W) sets the war at the high-water mark of the colonial powers, the 1975 scenario was meant to be the high-water mark of the smaller factions who were in play during the cold war era. (As an aside, I think the Imp Games “major neutral/neutral alliance” paradigm is sort of a response to World at War having tons and tons of independent neutrals, just waiting to be gobbled up, one by one.)

    Setup:
    An early draft of the rules/setup for this scenario are available here:
    https://drive.google.com/file/d/0B8U3vyGydEjmMTdyd1Frb0M0VTQ/view?usp=sharing

    Factions:
    Western Europe

    • European NATO countries (Iceland, UK, Portugal, France, Norway, West Germany, Italy, Greece, Turkey)
    • CENTO: a successor to the Baghdad Pact, which in this period includes the UK, Turkey, Iran, and Pakistan
    • SEATO: an alliance which included the major NATO powers (US, UK, France) as well as smaller regional partners (Pakistan, Thailand, Philippines, Australia, and New Zealand)
    • South Africa: arguably makes more sense as a US territory, but with the rest of Africa being more affiliated with Europe, I eventually decided to add them in here. During this period, they were fighting various factions either aligned with or backed by communist powers.

    US
    While things like the ANZUS pact and SEATO could reasonably slot Australia and New Zealand in with the US, the CENTO “piece of the puzzle” led me to slot them in with WE. To compensate, I shifted Canada over to the US; their cooperation would expand during the cold war era, with things like NORAD, and it just made sense that in the case of war, the NATO allies on the American continent would be more of a unified force.

    Warsaw Pact
    Around the time that West Germany was admitted into NATO, the USSR formed this pact with its eastern bloc satellites. By 1975, the Vietnam War had ended, with the communist forces taking control of the country. (Somalia and Ethiopia have a weird cold war history, but in the scope of a global war, I figured it made the most sense to stick the territory under the USSR.) After gaining independence from Portugal, Angola and Mozambique went communist, with the former receiving military aid from Cuba. Afghanistan was also ruled by a communist regime, at this time.

    Minor Neutrals

    • Yugoslavia had a falling out with the USSR, and never joined the Warsaw Pact. In 1955, Austria was also released from occupation, pledging to never join either of the major military alliances. Yugoslavia is a neutral territory in this scenario, since it approximately occupies the space of both of these countries (i.e. bordering Switzerland to the west.)
    • Israel had been proclaimed in 1948, and steadily gained more territory (in the intervening years leading up to this scenario) in successive wars against its Arab neighbours. Jordan is a neutral territory (representing Israel and its occupations/conquests) in this scenario.
    • Burma (now known as Myanmar) was one of the few countries to never join the British Commonwealth, after decolonization, so it is an independent neutral in this scenario.

    Major Neutrals

    • Organization of American States: (purple) remains unchanged from the original E&W, though communist influence began to creep in, throughout the cold war.
    • Arab League: (yellow) greatly expanded its membership, with the decolonization of various north African countries. (I’ve considered re-branding this faction to “Islamic Conference” which would allow it to also include Equatorial Africa, Maldives, and Indonesia – further consolidating a few minor neutrals.)
    • China (orange): expanded its territory with the annexation of Tibet, in the early 1950s. With Nixon’s visit to the country, and overall thawing of relations with the US, in this scenario China will support either the Soviets or the US.
    • Commonwealth of Nations (brown): from the ashes of the British Empire, this faction represents members of the Commonwealth who remained outside of the rival alliances.

  • who made the EW map? anybody know?


  • @Imperious-Leader said in "East & West" by Imp Games - Discussion:

    who made the EW map? anybody know?

    I have a hunch that Imp Games based it off of Xeno Games’ “World At War” map; without going into minute detail, it’s very similar, with just a handful of modifications, and some changes to IPC values.

    Also, the physical copies of the E&W rulebook say in the acknowledgements, “Also, special thanks to Frank Z., who paved the way.” which I assume is referring to Frank Zenau, (artist/designer for “World At War”)


  • @The-Janus But i was wondering who exactly made the map… somebody who also posted on that forum right?


  • Is there a better resolution of the map? I think id like to print a large format version


  • Tactics: Operation Fishnet (Soviet Pacific Fleet)

    For those who know me, I’ve historically mostly played as NATO in E&W. As part of the ongoing refinement of my Soviet strategy, I wanted to come up with some better opening moves for their naval units; here’s what I’ve been looking at just recently:
    (red arrows outline spaces that US navies could conceivably reach)
    6c58f165-9e4d-4054-afc3-cd4df2ae99b7-image.png

    Objectives: To stall US transport capability in the Pacific.

    This should be a fairly straightforwardly important goal, for any Soviet player: keeping the US off of your shores (or away from landing support into SE Asia.) It’s difficult to actually attack the US transports (because of their positioning) so instead we want to prevent them from steaming across the ocean, for as long as possible.

    Scatter
    The purpose of scattering your navy is to make it a less-attractive target for the US nuke. Many times, the Soviet moves in the Pacific involve slamming as much force as possible against another large force. Usually this is a no-win situation; either your remaining force is large enough to warrant dropping the bomb on, or is small enough that it is mopped up by US naval forces, with nary a whimper. Also, keeping subs separate from surface ships will tempt your opponent to split their air power from their naval power.

    Block
    By positioning the subs between your other ships, and the West US fleet, you’re able to effectively keep those units from using their full movement – unless the enemy attacks both ranks of your defensive line. Again, this is not the worst result, because you’ll have already prevented them from being able to concentrate their forces.
    If the Japan SZ fleet attacks the Soviet ships in the Bering Strait, this means that the transport at Okinawa cannot effectively be used to amphibiously assault Kamchatka or East Siberia; the ships at Hawaii are also blocked from providing shore bombardment, and the carrier cannot move in to provide a landing space for supporting fighter aircraft.

    Deadzone
    As you’ll note on the map, the Marcus Island SZ can potentially be hit by all of the US ships in the area. However, if the US moves heavily into this zone with their surface fleet, they will not be able to keep the Japan SZ well-defended – potentially leaving it open to a counter-attack, with support from Soviet aircraft. If they instead consolidate their navy at Marcus Island, their transports will be far out of position to send reinforcements to SE Asia.
    The place where the US can launch the strongest amphibious assault (with both their Japan fleet and Hawaii fleet) is against North Korea. Fortunately, the free Chinese infantry make this a tough nut to crack, and the Soviets should always have units in East Siberia and/or Manchuria, available for a counter-attack. Also, the commitment of US surface ships to such an attack would mean a much weaker naval response, to the Soviet fleets; if the US only commits submarines to Marcus Island, and only aircraft to deal with the Soviet submarines, they risk leaving the West US transport exposed to the Bering Strait ships. In this situation, the US may opt to instead move this transport towards the Panama Canal – both to be out of reach, and to instead assist in moving forces to Europe. In this case, the Soviet fleet will have succeeded at its objective.

    Let me know what you think about this opening move :)
    Comments and critiques are always welcome!


  • Strategy: Operation Underbelly (Soviet focus on India)

    This will likely be a multi-post topic, since there are so many moving parts.

    Objectives:

    • Reposition naval, air, and armored forces (on round 1) to strike at India on subsequent rounds
    • Secure front-line, back-line, and coastal positions

    There are obviously other considerations (which I will go into at more depth as they become pertinent) but those are the broad ideas behind this strategy.

    “Round Zero”
    With the standard “bid” of 20 IPCs, going with 10 infantry is usually the default action. Now, normally you would put these infantry into position to be used in combat immediately on round 1; this, however, is not entirely the case with this strategy. Since the USSR starts with so few forces in central Asia, we need to leverage round 0 to offset this, if we want to have any chance of overpowering the placement/reinforcement capability of the UK in India.
    I suggest this placement:

    1 inf - Mongolia
    2 inf - Kazakhstan
    2 inf - Turkmenistan
    3 inf - Georgia
    2 inf - Romania

    The infantry in Mongolia, Kazakhstan, and Turkmenistan can all reach the friendly Chinese territory of Sinkiang, which shares a border with India. We want the extra infantry in Georgia to help ensure we take Turkey on round 1 – granting us control of the strait, and thus defending our “back-line” territories (in this case, Romania, Ukraine, and Georgia.) We also want to be able to take out Greece; this destroys some valuable NATO equipment, as well as denying them a free place to land reinforcements. Ultimately, we want to spend as little time as possible dithering in the Balkans, so that we can get on to the rest of Europe.

    Round 1: Combat Movement
    (I’ve run all of these combats through the helpful calculator, provided at http://calc.axisandallies.org/ but feel free to test them for yourself) :)

    Since the subsequent non-combat moves are pivotal to the overall strategy, I’m going to make note of how much movement the offensive units need to use, to get into combat.

    West Germany: (1 bmb, 8 inf, 4 arm, 2 ftr)

    East Germany: 10 inf, 2 arm, 1 hrm, 1 ftr (moved 1 space)
    Poland: 6 inf, 1 arm, 1 ftr (moved 1 space)
    Yugoslavia: 4 inf, 1 arm (moved 1 space)
    Baltic States: 1 arm (moved 2 spaces)
    Total offense: 20 inf, 5 arm, 1 hrm, 2 ftr

    Greece: (4 inf, 1 arm, 1 ftr)

    Poland: 1 hrm (moved 2 spaces)
    Yugoslavia: 1 ftr (moved 1 space)
    Romania: 6 inf, 2 arm (moved 1 space)
    Total offense: 6 inf, 2 arm, 1 hrm, 1 ftr

    Turkey: (6 inf, 1 arm, 1 ftr)

    Ukraine: 2 inf (amphibious) via Black Sea transport
    Ukraine: 1 ftr (moved 2 spaces)
    Georgia: 7 inf
    Russia (aka Moscow): 2 arm, 1 hrm (moved 2 spaces)
    Total offense: 9 inf, 2 arm, 1 hrm, 1 ftr

    Pakistan: (1 inf)

    Russia: 1 ftr (moved 3 spaces)
    Turkmenistan: 3 inf
    Total offense: 3 inf, 1 ftr

    India SZ: (1 sub, 1 trn)

    Russia: 1 bmb (moved 4 spaces)
    Total offense: 1 bmb

    Japan SZ: (1 sub, 1 crz, 1 BB)

    East Siberia: 2 trn, 2 sub
    Kamchatka: 1 ftr (moved 2 spaces)
    North Korea: 1 ftr (moved 1 space)
    Total offense: 2 trn, 2 sub, 2 ftr

    North Sea: (2 trn, 1 crz)

    Komi SZ: 1 trn, 2 sub, 1 crz
    Baltic SZ: 1 sub
    Total offense: 1 trn, 3 sub, 1 crz

    Theorycraft: The Thinking Behind it All

    1. Yugoslavia armor to West Germany/Poland heavy armor to Greece.

    As I mentioned earlier, we don’t want to leave units stranded in the Balkans for very long, if we can help it. This is why the armor is sent to West Germany rather than Greece, while the heavy armor (with its extra movement) is sent to Greece rather than West Germany.

    1. Fighters in West Germany/Greece

    These aircraft are only moved 1 space, allowing them 3 spaces of movement on non-combat, for maximum flexibility in their redeployment.

    1. Why Pakistan?

    Part of the problem with India, is the number of places which it can draw forces from; taking out Pakistan removes one such place. It also grants you a potential landing space, for aircraft to be used against the Persian Gulf (i.e. Pakistan SZ) on following rounds.

    1. Disrupting the convoy routes

    In order to keep India from getting resupply, it is important to send our bomber against the India SZ. There are a couple ways to come at this: you want to at least strafe, and destroy the sub, so that it cannot be used to block or attack your naval units; if you also destroy the transport, this prevents the UK from moving an infantry immediately in from Singapore, or from sending it down towards South Africa (as part of a shuck-shuck strategy into Pakistan, on subsequent rounds.) It’s important to position your units to hit the sea zones near India early, since it will take until at least round 2 for UK surface ships to arrive.

    1. Japan SZ: The “cut and thrust”

    While the US transports in the area make for a tactically sound alternative target, the reason to take out the Japan SZ fleet, is to prevent it from being able to move towards the Burma SZ, providing cover (and an early rallying point) for UK transports in the area. As said before, we want these transports to be exposed to our air power for as long as we can manage. The reason why our cruisers are left out of this attack, is twofold: generally when the Soviet Pacific fleet masses in one zone, it gets taken out by the nuke, and; we want to be able to non-combat move these ships to the Shanghai SZ, putting them within 2 spaces of the India SZ. This puts us out of the various deadzones in the Pacific, and well out of range of US aircraft.

    We also want to use our submarines in the attack, since their “first strike” ability makes them the stronger offensive unit, while the cruisers are clearly the better defensive option. The Shanghai SZ is only within range of the US fighter in South Korea, and the US sub at Guam. However, if the US chooses to retreat their sub from our attack, this can cause many problems. First, it can block the Shanghai SZ; this means our cruisers will have to instead move to the Philippines SZ (if we still want them to be able to reach the India SZ) putting them within range of the US fighter in the Hawaiian SZ, as well as the bomber from Western US (potentially. ) Secondly, this would leave the US with another sub that they can use as fodder in any counter-attack. If the US does manage to put the Soviet fleet in a position to be counter-attacked strongly, we at least want to put forward our best defensive option; if the US can only commit 1 sub to this action, we might be able to take out one of their planes, potentially weakening any defensive boost they could provide to India, in the early rounds.

    An alternate move would be to use our cruisers in the “cut” against Japan SZ, and our transports for the “thrust” into Shanghai SZ. This would allow infantry to be transported to Hunan, where they can directly threaten Indochina on round 2 – but there are a few problems with this move. As mentioned, if the US chooses to save their sub, this would completely block the Soviets from making a safe landing of their infantry. The other problem is that (particularly after round 1) NATO is not going to be generating many reinforcements out of Indochina, meaning it is not a high priority target. In order to successfully take the territory, the Soviets would likely have to divert offensive units away from India. And finally, as a place for the Soviets to generate additional infantry (to support attacks into India) … well, Indochina (as it turns out) would be too little, too late. The infantry which would be used for this landing are simply better off being walked down to their target (as I will get into further, during the non-combat discussion.)

    It’s my estimation that NATO’s best move is always to just reinforce India as heavily as possible (and abandon Indochina straight away, rather than try and split their defensive forces) so that’s the strategy I’m planning against, as the Soviets. If NATO does beef up Indochina, you’re not going to have enough infantry to take it, and if they abandon it, you’re not going to have enough offense to take it – because you’ll have to commit more of those to India, to match NATO’s defensive commitment there. India has to be the first priority.

    1. The North Sea

    In a strategy that was not so strongly focused on India, I feel like it would be wise to commit more air power towards this theatre. As it is, your navies can generally only be relied on to survive a round or two (at the best of times) so you won’t have much of an opportunity to stir the pot with these ships. Taking out the transports causes the US to have to spend money replacing them, and the North Sea also happens to be the obvious rendezvous point for your two different groups of ships in the area. I think the strategy here should be to strafe, and then retreat your subs back behind the strait, while retreating any surface ships back to Komi SZ. Again, keeping your navies sort of spread out makes them a less desirable target for the nuke, but (particularly in this theatre) also forces NATO to spread their air power out, and away from places that they probably want to be redeploying them on non-combat.

    (to be continued)


  • Operation Underbelly (continued)

    Using the “average” results from the calculator, we should wind up with the armor and aircraft from our land battles intact; West Germany is taken with 10 infantry, Greece with 2, and Turkey with 4. Pakistan could be 2 or 3 infantry.

    Round 1: Non-Combat Movement
    First, the equipment (not including any retreating naval units):

    West Germany:
    5 arm (remain)
    1 hrm to Romania
    2 ftr to Georgia

    Greece:
    2 arm, 1 hrm to Romania

    Turkey:
    2 arm (remain)
    1 hrm to Georgia
    1 ftr to Kazakhstan

    Pakistan: 1 ftr to Sinkiang
    India SZ: 1 bmb to Sinkiang
    Japan SZ: 2 ftr to Hunan

    Next, the infantry:

    Karelia: 2 inf to Komi
    Baltic States: 4 inf to Poland
    Russia: 6 inf to Kazakhstan
    Kazakhstan: 4 inf to Sinkiang
    Mongolia: 2 inf to Sinkiang
    Baykal: 1 inf to Mongolia
    East Siberia: 3 inf to Manchuria
    North Korea: 5 inf to Manchuria

    And finally, any equipment that went unused during combat movement:

    Black Sea:
    1 sub to Cyprus SZ
    1 crz to Red Sea

    Russia:
    1 AA to Georgia

    North Korea: 2 arm to Inner Mongolia
    East Siberia:
    1 arm to Inner Mongolia
    2 crz to [either Shanghai SZ, or Philippines SZ]

    Theorycraft: The Thinking Behind it All

    1. The Baltic Sea, the Balkans, and the Mediterranean

    We’re hoping that NATO will not move heavily into Yugoslavia and/or Greece. If they do, it’s not particularly fatal, just time-consuming. So what we’ve done is leave our navies in positions to draw air power away from attacking these land territories; by scattering our ships, the NATO counter-attack likewise cannot be concentrated. Since our fighters in Georgia can potentially hit a good chunk of the Mediterranean, the NATO fleet might be convinced to redeploy towards the Atlantic; this would make our ships’ move towards the Red Sea pay off a lot more.

    In order to hit our subs in the Baltic, the UK or WE have to commit their aircraft. Likewise, they’ll probably want to send planes after our sub at Cyprus, so they don’t have to risk losing any ships. If NATO’s fleet in the Mediterranean is to link up near India or Pakistan, they need to clear both this SZ and the Red Sea – a potentially difficult task, if the Soviet sub can survive a WE air attack, and submerge. (This is what makes the sub a better choice than the cruiser, for blocking off the Suez canal from the Mediterranean.) And all that being said, NATO may prefer to send its subs and aircraft to the Black Sea, to take out our transport, in hopes of preventing any landings into Africa. Overall, this leaves them having to make difficult decisions about where to distribute their limited forces.

    In any case, if we need to counter-attack Yugoslavia, we have plenty of infantry in Poland and Romania. We can send armor from Romania, and then non-combat move them to West Germany, if desired. Likewise, the heavy armor’s extra movement can be used to counter-attack Greece, and still reposition onto the main front line.

    1. Location, Location, Location

    Essentially what we’ve done is move all of our air power closer to Asia. We’ve put aircraft in striking range of the entire coastline, as well as putting as much offensive capability as possible within range of India. We’ve also tried to keep as much naval power alive (and out of reach of hostiles) while moving them towards India – potentially allowing them to link up, if NATO disregards them for long enough. (As a quick note, if the attack in Japan SZ goes poorly, we should retreat, landing our fighters in Manchuria instead of Hunan.)

    Since we haven’t attacked South Korea, you’ll notice that all of our land forces which would have been used for that attack are now being funnelled through China. The armor will be used against India immediately; the infantry can be moved that direction if absolutely needed, but otherwise should be sent towards Burma and Indochina, to help mop up the region once India falls.

    1. Karelia/Komi

    If the UK chooses to go after any remaining surface vessels here, this leaves their own surface fleet out of position to cover the Irish SZ, which should be the main staging area for US transports. By retreating here, we block any naval bombardment that might accompany an amphibious assault. We also moved infantry to Komi, because we’ll need to place new infantry elsewhere (like Karelia) but we don’t want to leave this path to our capitol undefended.

    1. AA in Georgia

    While it’s not likely to be targeted by a suicidal airstrike, I still like to move the AA from Moscow here, to protect the valuable units rallying in this space. It also allows us (in future rounds) to move the AA from Ukraine closer to the front line, replacing it with this one. The Moscow IC shouldn’t be within range of strategic bombing in the early game, so it’s a fairly safe play.

    Round 1: Placement
    We’ll probably want to continue with all infantry, so let’s assume your starting 52 IPCs were spent as such.

    Here’s how I recommend deploying those 26 infantry:

    East Germany: 4 inf
    Yugoslavia: 2 inf
    Romania: 2 inf
    Baltic States: 1 inf
    Karelia: 4 inf
    Kazakhstan: 2 inf
    Turkmenistan: 2 inf
    East Siberia: 4 inf
    North Korea: 2 inf

    This leaves us with 3 infantry remaining, to kind of fiddle with. Here are some options for those:
    Poland: if you’re feeling vulnerable about your position in Europe
    Orel & Komi: if you want to further bolster your position in the north, and set up for attacks into Scandinavia; this allows the starting 1 inf in Orel to move to Komi or Karelia on round 1 non-combat movement.
    Georgia: my personal preference, particularly if your battle in Turkey did not go well, and you feel vulnerable to amphibious assault there or against Georgia itself. Otherwise, it also offers you extra forces for a potential attack on Iran in round 2, to link up your forces a little quicker. You can also move them to Kazakhstan (to help bolster any force moving into or through India) or Ukraine (if the Balkans get counter-attacked hard) or even to reinforce the north. Also, if your transport survives, it gives you some units to potentially ship to Libya or Sudan.
    Kamchatka & Mongolia: one more infantry in Mongolia on round 1 can be used against India on round 3, which is ideal. If you place in Kamchatka, you can non-combat move the starting infantry to East Siberia, if you’re fearing an amphibious assault (particularly if Japan SZ went poorly, and you don’t have any ships left there.)
    (some combination of The Urals, West Siberia, Baykal, and Mongolia): if you feel like you really want to boost the amount of units that can quickly reach Kazakhstan and/or East Siberia.

    These options give us a small amount of flexibility (with which we can build ourselves a bit of a cushion) to soften the blow of the dice going really badly, in a single battle.

    (to be continued)


  • @The-Janus

    good action here : )

    Maybe try and shorten up the reads a bit :)


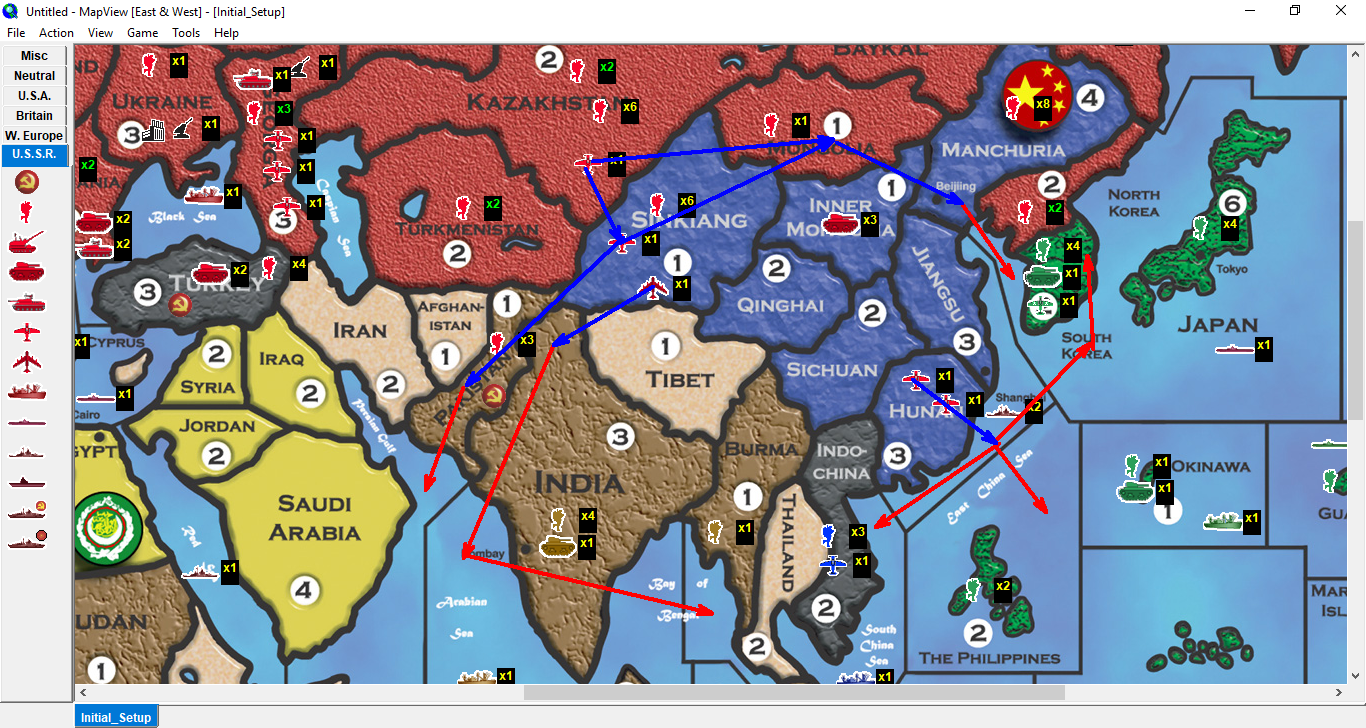
  • Just before I get into some of the nuts ‘n’ bolts, with the next post, here’s a visual representation of how Asia should look, at the end of the 1st Soviet turn; the arrows demonstrate the safe movement ranges of Soviet aircraft in the region, for round 2.

    8a1b5205-89b0-442d-b05e-6a83cbb1db99-image.png

    (Not illustrated here, but the bomber in Sinkiang can also hit any of the sea zones to the left-hand side of the screen.)

    As a slight addendum, I should mention that you could probably have the starting fighter from North Korea land in Sinkiang, rather than Hunan (since it has the range to do so.) This means less air support to potentially hit the Burma SZ, but if we’re working from the assumption of a “strong India” strategy from NATO, we’ll want more air power within range of the India SZ. This assumes that both the WE transport off Indochina and the UK transport from Australia will be moving to India SZ, to land reinforcements in India (a fairly standard tactic.)

    With that assumption in mind, it becomes a matter of whether you think the US will use their transport from Okinawa, to reinforce Burma or Indochina – and thus leave it basically undefended. Since the US can afford to play the “long game” it’s probably in their best interest to be a bit more conservative, rally their fleets, and set up a proper shuck-shuck; there’s no need to leave things to chance by rushing in.


  • Operation Underbelly (part 3…ish)

    Variables & Counter-attacks
    Anytime we’re dealing with naval battles in particular, there’s going to a fair bit more variance in the outcomes – and particularly with submarines, since they can retreat or submerge.

    In the Japan SZ battle, the “average” result is that we should be left with 1 sub (and 2 fighters.) As mentioned before, we absolutely don’t want to lose those fighters, but the naval units are expendable; however, if we have to retreat (in order to save those fighters) this messes up our positioning a little. Both can be retreated to North Korea; one will have 2 movement left (meaning it can make it to Jiangsu – as close to India and the Burma SZ as Hunan, but not as close to Indochina) and the other will have 3 movement (meaning it can get as far as either Hunan or Sinkiang.)

    Also, this gets sort of weird, in terms of rules. In the “3rd Edition/Iron Blitz” type of ruleset, air units can retreat separately from other attacking units – but this is not expressly in the E&W rules (whereas by contrast, the submerge/retreat rules for submarines are explicitly called out in the text.) This means that if there are ships remaining in the attacking force, the fighters would have to retreat back to the East Siberia SZ (since this is the only place that the naval units can retreat to, and all attacking units must retreat to the same space, as per 2nd Edition A&A rules.) If the ships are gone, it makes it easier for the planes to both just retreat to North Korea.

    Anyways, the India SZ battle is one that can go particularly random:
    If the bomber misses, the UK sub can retreat or submerge; it doesn’t particularly matter which, since the UK can sort of freely reposition on their own turn.
    However, they may decide to keep the sub in combat, to absorb hits for the transport. Essentially, the longer the transport survives, the better the chance it has of destroying the bomber (even if the result is mutual destruction.) Losing the bomber sucks, because it provides so much range and versatility, in addition to its offensive punch – but it’s hardly worth it to only take out the sub.

    One place that NATO can counter-attack (which is of particular concern) is in Pakistan. This is why the more conservative play is to simply non-combat move from Turkmenistan into Sinkiang, rather than attack Pakistan. However, any forces that’d be used for this counter-attack are also those which would otherwise be used to bolster the defense of India, making it essentially a wash; you still come out ahead in the sense that you’ve taken out the infantry that started in Pakistan, and UK can only place there on round 1 if WE is able to make the counter-attack.

    This would involve them transporting 2 of their infantry from Indochina by sea, supported by their fighter from the same territory. Again, how the Soviet attack goes will change how viable this attack is; it’s a lot more of a safe bet if the Soviets are only defending with 2 infantry, rather than 3. Otherwise, it’s probably up to the UK to counter-attack, with its starting 4 infantry and 1 armor from India.

    Another counter-attack to worry about is the US attacking into Kamchatka or East Siberia; again, this hinges on how well your Japan SZ attack went. If you have any ships left there, the US is unable to use its Okinawa transport in support of this landing, leaving only the potential for 1 infantry from Hawaii to wade ashore.

    I find that the strategy of going for this sort of assault, to be a strong one for the US. However, with India under heavy threat, there is the temptation to do the more defensive setup. Essentially what this involves, is moving the Hawaii fleet to Burma SZ, and the Western US fleet to Japan SZ, both by round 2. Then, transporting 2 infantry per round to Indochina via Philippines, while the other transports alternate between moving infantry to Indochina and South Korea, from Japan – having cover from surface ships, in either position:
    0c6c50fe-89ac-40dd-8d6f-dda59f4b6c2e-image.png

    And, as mentioned before, if the US retreats their sub from the Japan SZ fight, this can mess up your naval positioning, making for a much stronger potential counter-attack against your cruisers – which in turn will limit your ability to counter-counter-attack, on round 2.


  • Operation Underbelly (part 4)

    Execution
    So what should be used in the India attack?
    Everything that can reach. Throw the kitchen sink at it.

    The End.


    Ok, ok. So to go into a little more detail, if your bomber survives, and you throw all your units into the attack, you’re at about 50/50 odds of capturing the territory (assuming you’re not willing to lose any tanks or aircraft.) This means that half the time, a followup attack on round 3 will be required, in order to take the territory. Therefore, it’s probably wisest to hold back some units from the attack, so that they are freed up to be used elsewhere; treat the round 2 India attack as a strafe, but set yourself up to conquer it on the following round.

    Command Structure
    Let’s use this image from our earlier post, to help us organize our units a little bit. This arguably borders on being an exercise in roleplaying, but hey, let’s have a little fun with this. ;)

    alt text

    I’m going to our arrange offensive units into 4 basic types of groups: armor groups, air groups (i.e. fighters), reserve groups, and naval groups.

    Armor Group A (Alps)
    -Based in West Germany
    Armor Group B (Balkans)
    -Based in Romania
    Armor Group C (China)
    -Based in Inner Mongolia

    Air Group A (Arabian Sea)
    -Based in Kazakhstan and Sinkiang
    Air Group B (Bay of Bengal)
    -Based in Hunan (or Jiangsu)
    Air Group C (Caucasus/Caspian Sea/Cyprus)
    -Based in Georgia

    Reserve Group A (armor reserve)
    -Based in Turkey
    Reserve Group B (bomber)
    -Based in Sinkiang
    Reserve Group C (“cavalry”)
    -Based in Georgia (heavy armor, starting the game in Moscow)

    White Sea Fleet
    -Based in Komi SZ and/or Baltic Sea
    Red Sea Fleet
    -Based in Cyprus SZ and Red Sea
    Yellow Sea Fleet
    -Based in Shanghai SZ or Philippines SZ (and potentially Japan SZ)

    Objectives:
    Essentially what we want to do is take a look at what naval groups (if any) that NATO leaves us with, to start round 2; attach an air group, then decide on an attack to make. We should prioritize naval attacks in roughly this order:

    UK transports
    US transports
    WE transports
    <any other weak naval formations (i.e. subs)>

    Since keeping India from being reinforced is our main goal, it’s worthwhile to consider sending fighters (without any naval support) to take out any unescorted UK transports which may be within range. Generally, I’d expect the WE transport from Indochina to be moved towards the Mediterranean; this allows them to better leverage their main power base, potentially augmenting amphibious assaults into the Balkans and/or Turkey. This makes them a worthwhile target, but obviously not our highest priority in this strategy.

    Anyways, here are some alternate/additional attacks we can mix and match, on round 2, and the units which can potentially be attached to them:

    Task Force A: Arabian Sea (Pakistan SZ/India SZ)

    Air Group A
    Reserve Group B
    Red Sea Fleet
    Yellow Sea Fleet

    Task Force B: Bay of Bengal (Burma SZ)

    Air Group B
    Reserve Group B
    Yellow Sea Fleet

    Task Force C (navy): Cyprus SZ

    Air Group C
    Reserve Group B
    Red Sea Fleet

    Task Force C (army): Caucasus (Iran)

    Air Group A
    Air Group C
    Reserve Group A
    Reserve Group B
    Reserve Group C

    Task Force I: India

    Air Group A
    Air Group B
    Air Group C
    Armor Group C
    Reserve Group B
    Reserve Group C

    Task Force J: Japan SZ

    Air Group A
    Air Group B
    Reserve Group B
    Yellow Sea Fleet

    Now, as I’ve said, these are the units we can “potentially” assign to the attacks; for example, since the Iran attack is the only one to utilize Reserve Group A, it might be possible to make this attack using only that group (with accompanying infantry) so that the other groups can be attached to other task forces.


  • Operation Underbelly (part 4, continued)

    Theorycraft: The Thinking Behind it All

    1. The Iran Plan, and the Reserve Groups

    I’ve classed the Soviet bomber as a reserve group, simply because it can be used in any/all of the proposed attacks; the remaining reserve units are a bit more limited. Our “cavalry” group can reach India on round 2 – so that’s almost an automatic; the armor group is a little bit trickier. Basically, if these groups are not used to attack Iran (and subsequently non-combat move to Pakistan/Turkmenistan/Sinkiang, to aid the followup attack on India in round 3) then they need to be non-combat moved towards your next objective: either South Korea, or Norway.

    If not used against Iran, the armor can move one of a few ways:

    Kazakhstan->Manchuria->South Korea
    Kazakhstan->India->Burma
    Ukraine->Karelia->Norway
    Ukraine->Yugoslavia->Italy

    The heavy armor can basically be positioned alongside the regular armor, but since it has the extra movement, it can quite easily also be used to attack India, and still catch up.

    If you placed your 3 “flex” infantry in Georgia on round 1, this makes the Iran attack a lot more viable, since it means you can execute it without drawing significantly from your garrison forces in Turkey. Really, the objective with taking Iran is to move your reserve groups more quickly into the India theatre, and (potentially) move the rest of your armor more quickly out of that theatre (and onward to Europe) once India has been mopped up.

    The concern I have with taking Iran, is that the likely UK counter-strategy is to set up a shuck-shuck from Africa into Pakistan – combining their South African cruiser, Australian navy, and Mediterranean fleet in the Persian Gulf, by round 2. If Iran’s neutrality is broken, this opens the floodgate for NATO forces, into territories that the USSR would otherwise not have to worry too much about defending. I think what it boils down to, is whether the USSR is able to take out the India transport, and whether their sub at Cyprus manages to live long enough to keep the UK from getting through the Suez.

    This would mean the USSR has an extra cruiser (in the Red Sea) with another round to mop up the Australian navy, thus neutering the UK’s amphibious capabilities in the area. (Again, this would assume the “strong India” tactic, where the Australian navy moves to India SZ; if they don’t, India won’t be strong enough to withstand the USSR’s attack on round 2 – that’s just how much of a difference those Aussie infantry make.) If the Soviet bomber didn’t take out the India transport on round 1, then this cruiser (if able to survive) would also be able to re-engage that target, if it moves towards Mozambique; the bomber is also within range of this SZ.

    1. Japan SZ, 2: Electric Boogaloo

    As was illustrated in the earlier post, one conceivable US response is to set up their surface fleets in the Japan SZ and the Burma SZ. This is why a Soviet followup attack on Japan SZ is an attractive option… assuming it’s at all possible. For the attack to be viable, we need at least some of our navy in the Pacific to have survived the US counter-attack; if we have no ships left, it’s not advisable.

    The other drawback to this offensive, is that it requires all of our air power (within reach) to be redirected towards it, significantly weakening our India attack. It might be worthwhile in the long run (for preventing US reinforcements to southeast Asia, or amphibious assaults into East Siberia) but taking out India ASAP should always be the priority.

    The nice thing with this option, however, is that our air power is fairly well masked; the US may not see it coming. If they use up all their fodder (subs) counter-attacking our cruisers, this makes their surface ships even more vulnerable (assuming any fodder of our own remains, to throw into the attack.)

    1. Fire, Maneuver; Fire, Maneuver

    The important thing with using aircraft so heavily in the India strategy, is to always be repositioning them closer to the next objective. Once India falls, we need to non-combat move those fighters either towards South Korea, or our next target in Europe (likely Norway.)

    I’m a bit late in mentioning this, but the other reason for using our airpower in Asia (aside from being faster than armor, or even heavy armor) is that NATO does not begin with any AA guns there. This is why the “armor for Europe, air for Asia” doctrine helps us to maximize our offense, and minimize the risk to our units.

    1. You Sunk My Battleship!

    With the naval positioning I’ve proposed, one potential outcome of the NATO counter-maneuvers, is to end up with the WE ships from the Mediterranean being moved to the Cyprus SZ. This isn’t necessarily a “sexy” target, but I think part of the Soviet naval doctrine (that is emerging from my research into this strategy) is to take out these sorts of targets early, while you still have fodder (ships) to commit to these actions. This leaves any NATO transport capacity with fewer surface ships to escort them, thus making them potentially vulnerable to attacks by “naked” Soviet air forces (i.e. without naval support.)

    As I had touched on earlier, in a more “Europe First” type of strategy, it seems like it’d make sense to commit air and naval power to hit the British surface fleet first, and then smash the “softer” targets with whatever forces you can scrape together, on subsequent rounds. (It’s worth noting that, coincidentally, this UK fleet consists of the same units as the US starting fleet in the Japan SZ.)

    Also, splitting your naval forces allows for this sort of punch-counterpunch idea, whereby you always have a reserve naval force (for fodder) with which to strike back – assuming that NATO can’t afford to spread their attacks around, and sink everything all in one go.

Suggested Topics

  • 16
  • 6
  • 5
  • 1
  • 15
  • 30
  • 1
  • 7
Axis & Allies Boardgaming Custom Painted Miniatures

115

Online

17.4k

Users

40.0k

Topics

1.7m

Posts