


@Panther Unstickied today due to the release of version 2.0 :
https://www.axisandallies.org/forums/topic/35438/triplea-2-0-new-stable-has-been-released
Section O: Start.aam
Start.aam is the save file that contains the starting setup of pieces. This file is not necessary if there is no standard starting setup for your game. Note that the file contains the name of the module directory (.gim folder) that was used to create it, so it cannot be used for a module with a differently-named directory.
Creating Start.aam
Once you have created all the other desired files for your module, open your module in ABattleMap. Use your ToolBar to place pieces according to the way all games should begin in your module. I recommend using BigPieces (if you have them) for this so that you can adequately space the pieces for users who prefer to use BigPieces. Once you have finished, open the “File” menu, select “Save As…”, navigate to your module"s .GIM folder, type “Start” in the “File name:” field, and select “AAA Map (*.AAM)” in the “Save as type:” field. Press the “Save” button.
Section P: Using ABattleMap’s file conversion tools
There are several application tools included in an installation of ABattleMap 0.79f which are helpful and/or required for creating certain files used in a module. The tools are:
b242map.exe - this is used for creating SektorInfo.mapF from SektorInfo.bmpE
csek.exe - this is used for creating SektorInfo.sekL from SektorInfo.txtN
rsek.exe - this is used for creating SektorInfo.txtN from SektorInfo.sekL
You may also notice a bmp2map.exe file in your ABattleMap folder, but I have no idea what this is for or how to use it.
Each of these files must exist in the same folder as the source file they use and the file they will create, so it is a good idea to make a copy of each of these files in your module’s .GIM folder while you are working on it. To do this, simply open your ABattleMap program directory in Windows Explorer (usually located at C:\Program Files\ABattleMap) and drag each one from your ABattleMap folder to your module’s .GIM folder while holding the “Ctrl” key on your keyboard.
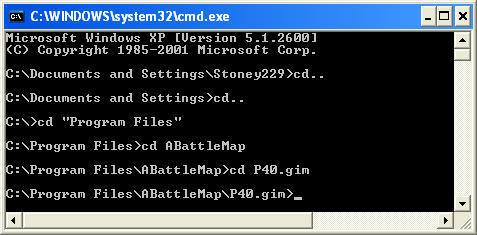
After you have the tool files in your module’s directory, you need to access them from the command console in order to use them. To open the command console, click “Start” and “Run…”. Type “cmd” in the “Run” window and press enter or click “OK”. You should see a black window with a file location followed by a blinking text insertion point, like this: “C:\Document and Settings\Stoney229>_”. This line is like viewing the “Stoney229” folder in Windows Explorer. To open a file in the “Stoney229” folder, you would type the file name and press enter. To open a subfolder in the “Stoney229” folder you would type “cd” (without quotes) followed by a space and the folder name and press enter. File or folder names that have at least one space require quotation marks (e.g. cd “My Documents” (with quotes)). To go up one folder you would type “cd…” (without quotes) and press enter.
You need to navigate from here to your module’s directory, so typing “cd…” and pressing enter will get you to C:\Document and Settings. “Cd…” and enter again will get you to C:. Once you are at C:, type “cd “Program Files”” (quotes around “Program Files” only) and press enter. Now type “cd ABattleMap” and press enter. Finally, type “cd” followed by a space and the name of your module’s directory (e.g. “P40.gim”) and press enter. Now you should be inside the folder containing all the files you need to access.
(Tip: instead of typing out the full name of a file or folder, you can type the first letter of the file or folder and press Tab on your keyboard to cycle through all files or folders beginning with that letter.)
From here you can use any of the .exe tools you have placed in your directory. To use b242map.exe to create a new SektorInfo.mapF file out of an existing SektorInfo.bmpE file, type “b242map.exe SektorInfo.bmp SektorInfo.map” (no quotes). SektorInfo.bmpE will remain in your folder and a new SektorInfo.mapF will appear.

To use csek.exe to create a new SektorInfo.sekL file out of an existing SektorInfo.txtN file, type “csek.exe SektorInfo.txt SektorInfo.sek” (no quotes). SektorInfo.txtN will remain in your folder and a new SektorInfo.sekL will appear.
To use rsek.exe to create a new SektorInfo.txtN file out of an existing SektorInfo.sekL file, type “rsek.exe SektorInfo.sek > SektorInfo.txt” (no quotes). SektorInfo.sekL will remain in your folder and a new SektorInfo.txtN will appear. Note that the required “>” between the source and destination files is unique to this tool.
Section Q: The hexadecimal number system
Using Windows Calculator to convert a number to hexadecimal
Open Windows Calculator by clicking Start>All Programs>Accessories>Calculator. Click the “View” menu and select “Scientific”. Type in a number to be converted to hexadecimal. Press F5 on your keyboard and the decimal number will be converted to hexadecimal. Press F6 to convert it back to decimal.
Understanding the hexadecimal number system
Numbers are abstract entities which can be represented in a variety of different ways. Most of us represent numbers using a decimal (base-10) number system - that is, one with 10 different symbols, or digits, to represent all numbers. Our first 10 numbers: 0, 1, 2, 3, 4, 5, 6, 7, 8, and 9 only require one digit to be represented, but since there are only ten different digits, our eleventh number (10) requires a combination of digits, or symbols, to be represented. The way we do this is by assigning place values - we have a “ones” (100) place, the right-most digit of any number, and “tens” (101) place to the left of that, a “hundreds” (102) place to the left of that, and so on. When we’re used to using the decimal number system, we don’t have to think about the fact that the number 1265, for example, represents a number far larger then the measly number of 4 small digits it takes to represent the abstract 1265. Instead, we intuitively know that the “1” is really 1 thousand (103), the “2” is 2 hundreds (102), the “6” is 6 tens (101), and the 5 is 5 ones (100). In other words, as we count, when we run out of digits (7… 8… 9… ?), we add one into the next place and start over (10… 11… 12…). Using this method, we could create a number system using any number of digits and still be able to represent any number imaginable. Even if we only had 2 digits to work with, we could count: 0… 1… 10… 11… 100… 101… 110… 111… 1000… 1001… 1010… 1011… 1100… 1101… 1110… 1111… and so on. Using a smaller number of different digits requires more of the same digits to be used to represent a single number. The converse, however, is that if we used a number system based on something larger than ten, we would have more digits to work with and each number would be represented with a more efficient use of digits.
The hexadecimal number system has 16 different digits: 0, 1, 2, 3, 4, 5, 6, 7, 8, 9, A, B, C, D, E, and F, in that order. What comes after F? 10 of course! Although F (hexadecimal) is the same number as 15 (decimal), the hexadecimal system has place values in the same way as the decimal system. There’s the ones (160) place, the sixteens (161) place, the two hundred fifty-sixes (162) place, and so on. So why does 10 (hexadecimal) represent the same number as 16 (decimal)? Because you have 1 sixteen and 0 ones, just like having 1 ten and 6 ones.
What’s 1265 (just a random number) in hexadecimal? The first thing to think about is how many places will it take? Does 1265 fit in the ones place of the hexadecimal number system? Are there 16 or more ones in 1265? Yes, so since we only have 16 different digits to put in each place, it must take more than one place. So then let’s look at the sixteens place: are there 16 or more sixteens in 1265? What is 16 16s? It is 256, so yes, there are more, and thus 1265 must take more than 2 places even in hexadecimal. So let’s look at the next place - are there 16 or more 256s in 1265? 16x256 is 4096, so no there are not 16 256s in 1265. That means the number 1265 (decimal) in hexadecimal must only take the ones place, the 16s place, and the 256s place - three places/digits in total. How many whole 256s are there in 1265? 1265/256=4.94140625, so there are 4 whole 256s in 1265. But 4 256s only accounts for 1024, and our number is 1265, so the remaining 241 must be represented in smaller denominations than the 256s. So the next place is the 16s place - how many whole 16s are there in 241? 241/16=15.0625. But how do we represent 15 in a single digit? In hexadecimal the 16th digit is F, so we have 4 256s, and we have “F” 16s. Those 15 (or “F”) 16s only account for 240 of our remaining 241, so we still have 1 left. We must move on to the ones place - how many whole ones go into 1? Exactly one! So since 1 thousand, 2 hundreds, 6 tens, and 5 ones are the same as 4 256s, 15 16s, and 1 one, then 1265 (decimal) must be the same as 4F1 (hexadecimal)!
Another way to think about it is this: Imagine going to a bank that only has dollar bills in denominations of 160 (1), 161 (16), 162 (256), 163 (4096) and so on. They will always give you change in the highest denominations possible, so that they handle the fewest number of bills. If you withdraw $1265, what bills will you get? You will get 4 $256-bills, 15 $16-bills, and 1 $1-bill.
That’s how it works!
Section R: .zip files
.ZIP files are like windows folders in that they can contain any number of files, but they package all the information up into one tidy file. Furthermore, they store redundant information in the files more efficiently so they take up less space on a computer or server and less bandwidth when being transferred over a network connection. These features make .zip files very useful for distributing the multiple files of an ABattleMap module over the internetS. Once files have been packaged into a .zip file, they can be easily extracted again for regular use using the Windows Extraction Wizard.
Creating a .zip file
To copy your module into a single .zip file, first create an empty .zip file by right-clicking an empty space in your ABattleMap program folder, selecting “New”, and selecting “Compressed (zipped) Folder”. Then drag your module’s .GIM folder onto the icon of the new .zip folder. If you have some extra files in your module’s directory, you may want to drag the necessary files of your module into the .zip folder one at a time. Now you have a .zip file containing your module, ready to upload to the internetS!
Extracting a .zip file
To restore the contents of a .zip file, right-click the file, select “Extract All…”, and follow the instructions in the Extraction Wizard.
Section S: Uploading for internet distribution
An ABattleMap module is hardly any fun if you are the only one who has it. Thankfully, there are online file hosting websites like Mediafire.com that allow you to upload your files for free and provide you with a link that can be given to others who wish to download your files.
To upload your filesR to Mediafire, you should first follow the instructions to create a user account (free). With a user account, uploading files is pretty easy and straight-forward. Once you have uploaded a file, you should see it in your online folder. If you click the “Share” button to the far right of your uploaded file, you will get a drop-down display that shows 2 different sharing URLs for that file. Copy one of the URLs and post it in the AxisandAllies.org forums for everyone to download and enjoy!
Section T: Glossary
This is a work in progress. If you have any questions or suggestions for adding to this section, please post them on this thread.
convoy: can refer to “convoy disruption” or “convoy route”
current sector: the sector currently being edited in the SektorEdit window.
at-war status: for the purposes of ABattleMap, the at-war status of a power determines whether or not that power can afflict convoy disruption damage. SektorInfo.txtN/SektorInfo.sekL must contain pseudo-sectors to define which sector must be controlled for each power to be considered at war with each other power.
convoy disruption: a set of rules included in some games that involves naval units reducing the income value of neighboring enemy territories. Convoy disruption is subject to “at-war” status of the aggressing power. Convoy disruption can not cause more income damage than the total income value of the territories it affects.
convoy routes: additional sectors that must be controlled in order for a power to receive the income of a specific sector.
power: a nation-player in a game. Powers are designated and numbered by their corresponding rows in ToolPieces.bmpG.
sector: any designated space on the map in a module. Sectors are territories, sea zones, and other spaces used for any of various purposes. Modules must contain working SektorInfo.mapF and SektorInfo.sekL files in order to have designated sectors.
Section U: The FAQ
This is a work in progress. If you have any questions or suggestions for adding to this section, please post them on this thread.
Section V: Change log
v1.0 (June 16, 2010)
-(original document)
v1.01 (October 27, 2010)
-Section P, changed @Stoney229:
type “rsek.exe SektorInfo.sek > SektorInfo.sek”
to @Stoney229:
type “rsek.exe SektorInfo.sek > SektorInfo.txt”
-(updated on 10/20/2013 to corrected for UTF-8 characters gone missing, presumably due to forum software upgrade)
[reserved for future use]
[reserved for future use]
[reserved for future use]
Does anyone know how I can adjust the column width of my tables in Section C?
Also, my browser does not load all the images, though it used to. I am curious to hear if you are or aren’t also having this problem.
Also, my browser does not load all the images, though it used to. I am curious to hear if you are or aren’t also having this problem.
No problems with Firefox, Opera, IE (latest versions).
Great job, Stoney, thank you!!!
This thread should be stickied :-)
@P@nther:
Also, my browser does not load all the images, though it used to. I am curious to hear if you are or aren’t also having this problem.
No problems with Firefox, Opera, IE (latest versions).
Great job, Stoney, thank you!!!
This thread should be stickied :-)
Good to hear, thank you. Maybe it’s my browser (chrome), or maybe it’s my slow internet connection.
Glad you like it. Thank you!
This is Great! Excellent work!
I’ve been having trouble with my Toolbar in 0.80… it disappears… got any fix for that? I’m using Windows Vista… never had the trouble until now.
This is Great! Excellent work!
Thanks very much!
I’ve been having trouble with my Toolbar in 0.80… it disappears… got any fix for that? I’m using Windows Vista… never had the trouble until now.
Is it not the same problem that is solved by the ABattlemap.ini trick? That bug should be fixed if you care to upgrade to version 0.80+. Also, Sektor Editor is a little buggy in version 0.80, but it works (with one exception noted in the tutorial) great in version 0.80+. Dont worry, it won’t break any compatibility or anything!
Do you have a link to downloand the 0.80+ version? I can only find 0.80
**I got it… just needed the P40 installed.
Well explained! :mrgreen: thanks!
To use rsek.exe to create a new SektorInfo.txtN file out of an existing SektorInfo.sekL file, type “rsek.exe SektorInfo.sek > SektorInfo.sek” (no quotes). SektorInfo.sekL will remain in your folder and a new SektorInfo.txtN will appear. Note that the required “>” between the source and destination files is unique to this tool.
It should be “rsek.exe SektorInfo.sek > SektorInfo.txt”, or otherwise sektorinfo.sek will corrupt trying to convert to itself. Check this, Stoney (I found this while I was trying to update F40 module)
By jove, you’re right! sorry about that! Look forward to seeing your module. I actually expect to have electricity installed to where I am living before the end of the year, and so I may continue (even if for my own personal fulfillment) to finish what I had started, but even if I do it will be many months before being completed.

