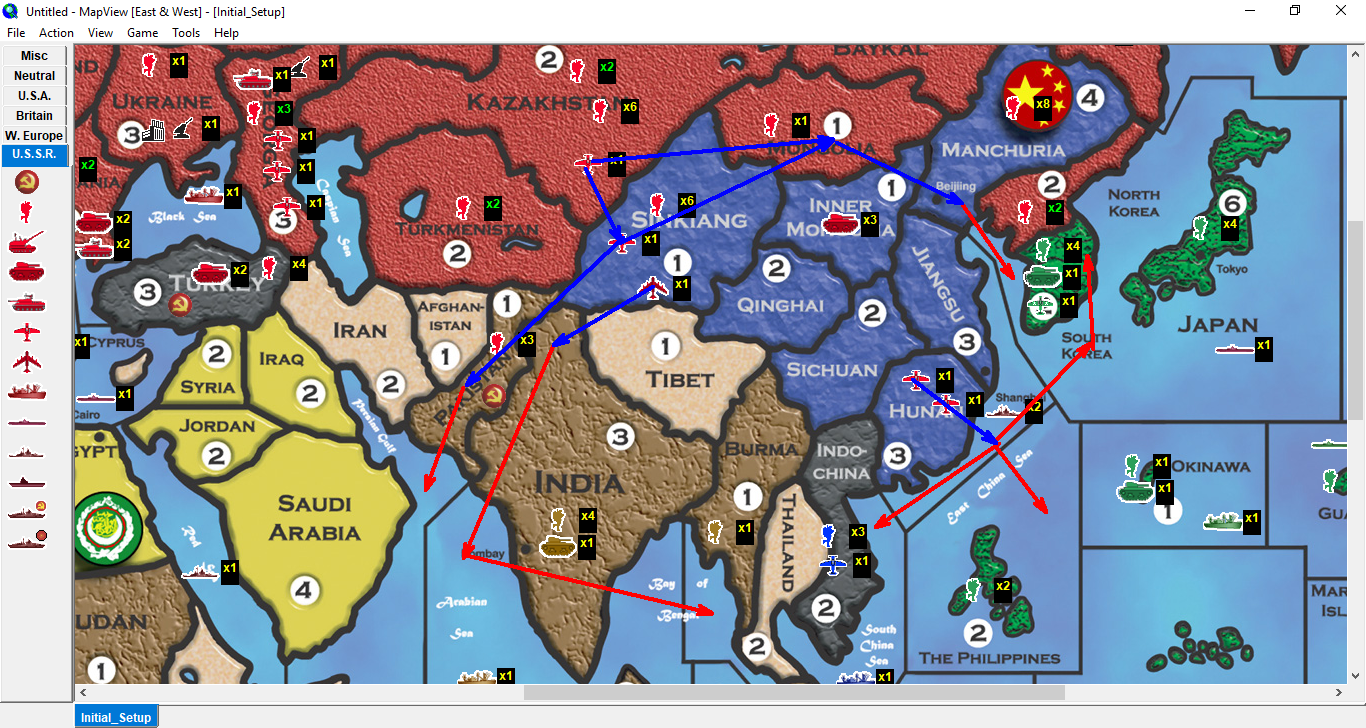
• Just before I get into some of the nuts ‘n’ bolts, with the next post, here’s a visual representation of how Asia should look, at the end of the 1st Soviet turn; the arrows demonstrate the safe movement ranges of Soviet aircraft in the region, for round 2.

    8a1b5205-89b0-442d-b05e-6a83cbb1db99-image.png

    (Not illustrated here, but the bomber in Sinkiang can also hit any of the sea zones to the left-hand side of the screen.)

    As a slight addendum, I should mention that you could probably have the starting fighter from North Korea land in Sinkiang, rather than Hunan (since it has the range to do so.) This means less air support to potentially hit the Burma SZ, but if we’re working from the assumption of a “strong India” strategy from NATO, we’ll want more air power within range of the India SZ. This assumes that both the WE transport off Indochina and the UK transport from Australia will be moving to India SZ, to land reinforcements in India (a fairly standard tactic.)

    With that assumption in mind, it becomes a matter of whether you think the US will use their transport from Okinawa, to reinforce Burma or Indochina – and thus leave it basically undefended. Since the US can afford to play the “long game” it’s probably in their best interest to be a bit more conservative, rally their fleets, and set up a proper shuck-shuck; there’s no need to leave things to chance by rushing in.


  • Operation Underbelly (part 3…ish)

    Variables & Counter-attacks
    Anytime we’re dealing with naval battles in particular, there’s going to a fair bit more variance in the outcomes – and particularly with submarines, since they can retreat or submerge.

    In the Japan SZ battle, the “average” result is that we should be left with 1 sub (and 2 fighters.) As mentioned before, we absolutely don’t want to lose those fighters, but the naval units are expendable; however, if we have to retreat (in order to save those fighters) this messes up our positioning a little. Both can be retreated to North Korea; one will have 2 movement left (meaning it can make it to Jiangsu – as close to India and the Burma SZ as Hunan, but not as close to Indochina) and the other will have 3 movement (meaning it can get as far as either Hunan or Sinkiang.)

    Also, this gets sort of weird, in terms of rules. In the “3rd Edition/Iron Blitz” type of ruleset, air units can retreat separately from other attacking units – but this is not expressly in the E&W rules (whereas by contrast, the submerge/retreat rules for submarines are explicitly called out in the text.) This means that if there are ships remaining in the attacking force, the fighters would have to retreat back to the East Siberia SZ (since this is the only place that the naval units can retreat to, and all attacking units must retreat to the same space, as per 2nd Edition A&A rules.) If the ships are gone, it makes it easier for the planes to both just retreat to North Korea.

    Anyways, the India SZ battle is one that can go particularly random:
    If the bomber misses, the UK sub can retreat or submerge; it doesn’t particularly matter which, since the UK can sort of freely reposition on their own turn.
    However, they may decide to keep the sub in combat, to absorb hits for the transport. Essentially, the longer the transport survives, the better the chance it has of destroying the bomber (even if the result is mutual destruction.) Losing the bomber sucks, because it provides so much range and versatility, in addition to its offensive punch – but it’s hardly worth it to only take out the sub.

    One place that NATO can counter-attack (which is of particular concern) is in Pakistan. This is why the more conservative play is to simply non-combat move from Turkmenistan into Sinkiang, rather than attack Pakistan. However, any forces that’d be used for this counter-attack are also those which would otherwise be used to bolster the defense of India, making it essentially a wash; you still come out ahead in the sense that you’ve taken out the infantry that started in Pakistan, and UK can only place there on round 1 if WE is able to make the counter-attack.

    This would involve them transporting 2 of their infantry from Indochina by sea, supported by their fighter from the same territory. Again, how the Soviet attack goes will change how viable this attack is; it’s a lot more of a safe bet if the Soviets are only defending with 2 infantry, rather than 3. Otherwise, it’s probably up to the UK to counter-attack, with its starting 4 infantry and 1 armor from India.

    Another counter-attack to worry about is the US attacking into Kamchatka or East Siberia; again, this hinges on how well your Japan SZ attack went. If you have any ships left there, the US is unable to use its Okinawa transport in support of this landing, leaving only the potential for 1 infantry from Hawaii to wade ashore.

    I find that the strategy of going for this sort of assault, to be a strong one for the US. However, with India under heavy threat, there is the temptation to do the more defensive setup. Essentially what this involves, is moving the Hawaii fleet to Burma SZ, and the Western US fleet to Japan SZ, both by round 2. Then, transporting 2 infantry per round to Indochina via Philippines, while the other transports alternate between moving infantry to Indochina and South Korea, from Japan – having cover from surface ships, in either position:
    0c6c50fe-89ac-40dd-8d6f-dda59f4b6c2e-image.png

    And, as mentioned before, if the US retreats their sub from the Japan SZ fight, this can mess up your naval positioning, making for a much stronger potential counter-attack against your cruisers – which in turn will limit your ability to counter-counter-attack, on round 2.


  • Operation Underbelly (part 4)

    Execution
    So what should be used in the India attack?
    Everything that can reach. Throw the kitchen sink at it.

    The End.


    Ok, ok. So to go into a little more detail, if your bomber survives, and you throw all your units into the attack, you’re at about 50/50 odds of capturing the territory (assuming you’re not willing to lose any tanks or aircraft.) This means that half the time, a followup attack on round 3 will be required, in order to take the territory. Therefore, it’s probably wisest to hold back some units from the attack, so that they are freed up to be used elsewhere; treat the round 2 India attack as a strafe, but set yourself up to conquer it on the following round.

    Command Structure
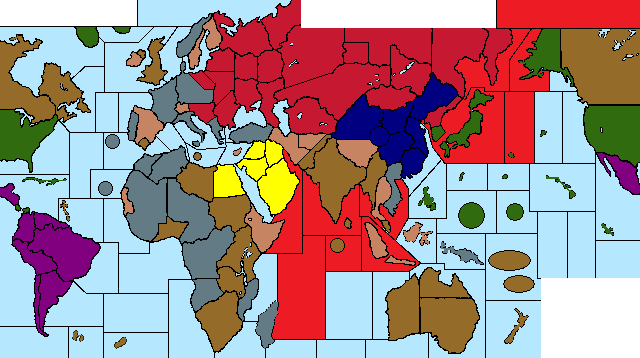
    Let’s use this image from our earlier post, to help us organize our units a little bit. This arguably borders on being an exercise in roleplaying, but hey, let’s have a little fun with this. ;)

    alt text

    I’m going to our arrange offensive units into 4 basic types of groups: armor groups, air groups (i.e. fighters), reserve groups, and naval groups.

    Armor Group A (Alps)
    -Based in West Germany
    Armor Group B (Balkans)
    -Based in Romania
    Armor Group C (China)
    -Based in Inner Mongolia

    Air Group A (Arabian Sea)
    -Based in Kazakhstan and Sinkiang
    Air Group B (Bay of Bengal)
    -Based in Hunan (or Jiangsu)
    Air Group C (Caucasus/Caspian Sea/Cyprus)
    -Based in Georgia

    Reserve Group A (armor reserve)
    -Based in Turkey
    Reserve Group B (bomber)
    -Based in Sinkiang
    Reserve Group C (“cavalry”)
    -Based in Georgia (heavy armor, starting the game in Moscow)

    White Sea Fleet
    -Based in Komi SZ and/or Baltic Sea
    Red Sea Fleet
    -Based in Cyprus SZ and Red Sea
    Yellow Sea Fleet
    -Based in Shanghai SZ or Philippines SZ (and potentially Japan SZ)

    Objectives:
    Essentially what we want to do is take a look at what naval groups (if any) that NATO leaves us with, to start round 2; attach an air group, then decide on an attack to make. We should prioritize naval attacks in roughly this order:

    UK transports
    US transports
    WE transports
    <any other weak naval formations (i.e. subs)>

    Since keeping India from being reinforced is our main goal, it’s worthwhile to consider sending fighters (without any naval support) to take out any unescorted UK transports which may be within range. Generally, I’d expect the WE transport from Indochina to be moved towards the Mediterranean; this allows them to better leverage their main power base, potentially augmenting amphibious assaults into the Balkans and/or Turkey. This makes them a worthwhile target, but obviously not our highest priority in this strategy.

    Anyways, here are some alternate/additional attacks we can mix and match, on round 2, and the units which can potentially be attached to them:

    Task Force A: Arabian Sea (Pakistan SZ/India SZ)

    Air Group A
    Reserve Group B
    Red Sea Fleet
    Yellow Sea Fleet

    Task Force B: Bay of Bengal (Burma SZ)

    Air Group B
    Reserve Group B
    Yellow Sea Fleet

    Task Force C (navy): Cyprus SZ

    Air Group C
    Reserve Group B
    Red Sea Fleet

    Task Force C (army): Caucasus (Iran)

    Air Group A
    Air Group C
    Reserve Group A
    Reserve Group B
    Reserve Group C

    Task Force I: India

    Air Group A
    Air Group B
    Air Group C
    Armor Group C
    Reserve Group B
    Reserve Group C

    Task Force J: Japan SZ

    Air Group A
    Air Group B
    Reserve Group B
    Yellow Sea Fleet

    Now, as I’ve said, these are the units we can “potentially” assign to the attacks; for example, since the Iran attack is the only one to utilize Reserve Group A, it might be possible to make this attack using only that group (with accompanying infantry) so that the other groups can be attached to other task forces.


  • Operation Underbelly (part 4, continued)

    Theorycraft: The Thinking Behind it All

    1. The Iran Plan, and the Reserve Groups

    I’ve classed the Soviet bomber as a reserve group, simply because it can be used in any/all of the proposed attacks; the remaining reserve units are a bit more limited. Our “cavalry” group can reach India on round 2 – so that’s almost an automatic; the armor group is a little bit trickier. Basically, if these groups are not used to attack Iran (and subsequently non-combat move to Pakistan/Turkmenistan/Sinkiang, to aid the followup attack on India in round 3) then they need to be non-combat moved towards your next objective: either South Korea, or Norway.

    If not used against Iran, the armor can move one of a few ways:

    Kazakhstan->Manchuria->South Korea
    Kazakhstan->India->Burma
    Ukraine->Karelia->Norway
    Ukraine->Yugoslavia->Italy

    The heavy armor can basically be positioned alongside the regular armor, but since it has the extra movement, it can quite easily also be used to attack India, and still catch up.

    If you placed your 3 “flex” infantry in Georgia on round 1, this makes the Iran attack a lot more viable, since it means you can execute it without drawing significantly from your garrison forces in Turkey. Really, the objective with taking Iran is to move your reserve groups more quickly into the India theatre, and (potentially) move the rest of your armor more quickly out of that theatre (and onward to Europe) once India has been mopped up.

    The concern I have with taking Iran, is that the likely UK counter-strategy is to set up a shuck-shuck from Africa into Pakistan – combining their South African cruiser, Australian navy, and Mediterranean fleet in the Persian Gulf, by round 2. If Iran’s neutrality is broken, this opens the floodgate for NATO forces, into territories that the USSR would otherwise not have to worry too much about defending. I think what it boils down to, is whether the USSR is able to take out the India transport, and whether their sub at Cyprus manages to live long enough to keep the UK from getting through the Suez.

    This would mean the USSR has an extra cruiser (in the Red Sea) with another round to mop up the Australian navy, thus neutering the UK’s amphibious capabilities in the area. (Again, this would assume the “strong India” tactic, where the Australian navy moves to India SZ; if they don’t, India won’t be strong enough to withstand the USSR’s attack on round 2 – that’s just how much of a difference those Aussie infantry make.) If the Soviet bomber didn’t take out the India transport on round 1, then this cruiser (if able to survive) would also be able to re-engage that target, if it moves towards Mozambique; the bomber is also within range of this SZ.

    1. Japan SZ, 2: Electric Boogaloo

    As was illustrated in the earlier post, one conceivable US response is to set up their surface fleets in the Japan SZ and the Burma SZ. This is why a Soviet followup attack on Japan SZ is an attractive option… assuming it’s at all possible. For the attack to be viable, we need at least some of our navy in the Pacific to have survived the US counter-attack; if we have no ships left, it’s not advisable.

    The other drawback to this offensive, is that it requires all of our air power (within reach) to be redirected towards it, significantly weakening our India attack. It might be worthwhile in the long run (for preventing US reinforcements to southeast Asia, or amphibious assaults into East Siberia) but taking out India ASAP should always be the priority.

    The nice thing with this option, however, is that our air power is fairly well masked; the US may not see it coming. If they use up all their fodder (subs) counter-attacking our cruisers, this makes their surface ships even more vulnerable (assuming any fodder of our own remains, to throw into the attack.)

    1. Fire, Maneuver; Fire, Maneuver

    The important thing with using aircraft so heavily in the India strategy, is to always be repositioning them closer to the next objective. Once India falls, we need to non-combat move those fighters either towards South Korea, or our next target in Europe (likely Norway.)

    I’m a bit late in mentioning this, but the other reason for using our airpower in Asia (aside from being faster than armor, or even heavy armor) is that NATO does not begin with any AA guns there. This is why the “armor for Europe, air for Asia” doctrine helps us to maximize our offense, and minimize the risk to our units.

    1. You Sunk My Battleship!

    With the naval positioning I’ve proposed, one potential outcome of the NATO counter-maneuvers, is to end up with the WE ships from the Mediterranean being moved to the Cyprus SZ. This isn’t necessarily a “sexy” target, but I think part of the Soviet naval doctrine (that is emerging from my research into this strategy) is to take out these sorts of targets early, while you still have fodder (ships) to commit to these actions. This leaves any NATO transport capacity with fewer surface ships to escort them, thus making them potentially vulnerable to attacks by “naked” Soviet air forces (i.e. without naval support.)

    As I had touched on earlier, in a more “Europe First” type of strategy, it seems like it’d make sense to commit air and naval power to hit the British surface fleet first, and then smash the “softer” targets with whatever forces you can scrape together, on subsequent rounds. (It’s worth noting that, coincidentally, this UK fleet consists of the same units as the US starting fleet in the Japan SZ.)

    Also, splitting your naval forces allows for this sort of punch-counterpunch idea, whereby you always have a reserve naval force (for fodder) with which to strike back – assuming that NATO can’t afford to spread their attacks around, and sink everything all in one go.


  • Wow you have done alot of work here. I wish you played Great War,as i know these rules much better…


  • Operation Underbelly (part 5)

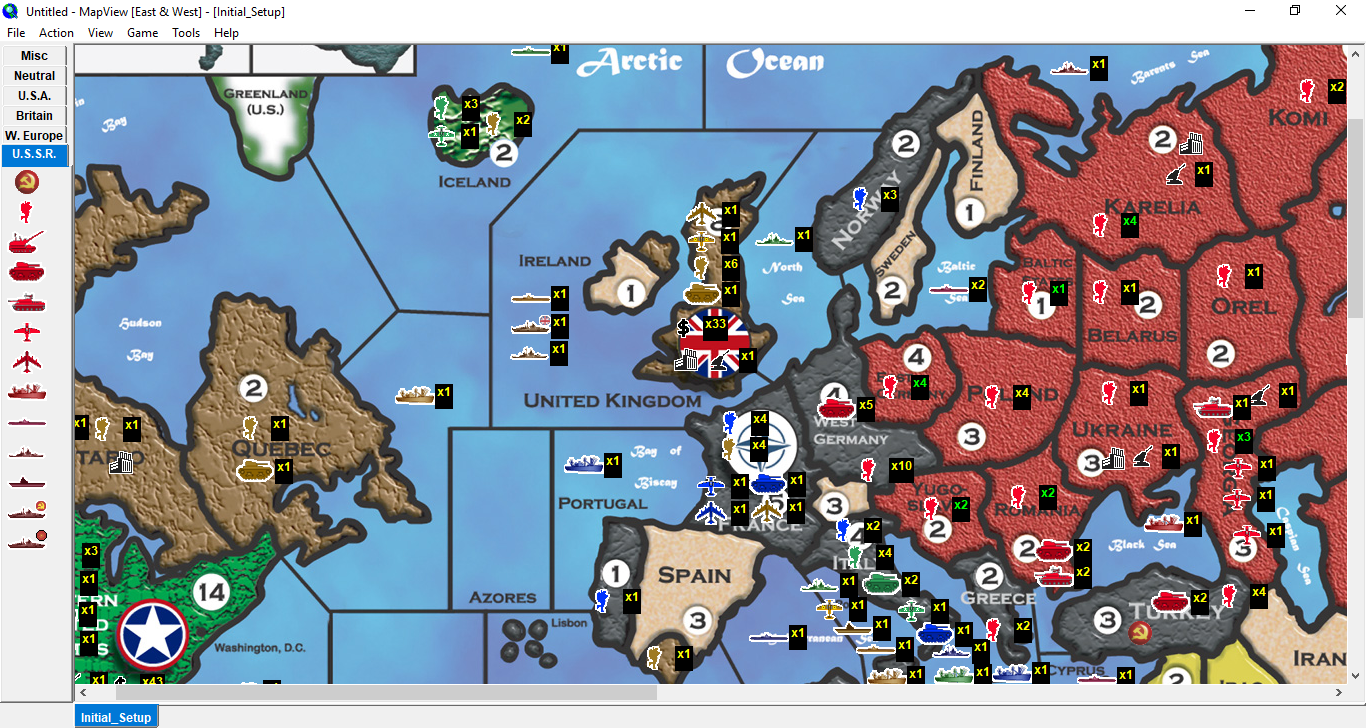
    Meanwhile, in Europe…

    Operation Underbelly - Europe.png

    This depiction assumes your 3 “flex” infantry were placed in Georgia.

    Essentially, what I feel the strategy in Europe should be, is to gradually build up a spearhead which can defeat NATO. This leg of the operation extends beyond the opening moves (and as such, is mostly just a hypothesis) so I’ll try and lay out the thinking behind it.

    The frontline territories of this theatre are West Germany (opposite France) and Yugoslavia (opposite Italy.) As mentioned early on, one of our wider strategic goals is the securing of our “back-line” positions; controlling West Germany achieves this objective, because it blocks the strait into the Baltic Sea, thus protecting Poland and the Baltic States from amphibious invasion. Attacking West Germany on round 1 also serves to destroy all the valuable NATO equipment which begins the game there. But what about later in the game?

    Since our focus with this strategy is in Asia, our unit output in Europe is a lot more limited. So, in order to create this proposed spearhead, we need to be constantly building forces along our frontline and coastal territories, but likewise always moving them towards the “tip” of the spear.

    Every turn, we should be placing infantry in Europe, something like this:

    4 inf - Karelia
    4 inf - West Germany [or Poland + Baltic States]
    4 inf - Yugoslavia + Greece [substituting in Romania, if one is under NATO control]

    After our 1st turn, we’re not going to continue placing in East Germany; these essentially become “static divisions.” Instead, what we’ll be doing is moving our forces down from Karelia, to the Baltic States, then Poland, and onto one of our “frontline” territories. Now, you’ll notice that if we also place in Poland on round 2 (while moving our units forward) we end up with a solid infantry wall, along the Baltic coast; Karelia, Baltic States, Poland, and East Germany will each have 4 infantry on them (at all times) and this can be sustained simply by placing 4 infantry in Karelia each turn, and moving them forward as part of building up our spearhead. The next question is, where should this spearhead be positioned?

    It is my suspicion that NATO will try and create diversionary attacks into either Yugoslavia or Greece, for as many turns as possible. This leads me to the conclusion that our aim should be to eventually rally Armor Group A and Armor Group B in Yugoslavia, as well as funneling our infantry towards this frontline territory (if even that means going through West Germany first, for a few rounds.) Having tanks here allows us to crush any landings in Greece, and then regroup; Yugoslavia is also what I consider the “keystone state” of Europe, since it borders such strategically important territories as Italy and West Germany, and is a gateway to the Balkans. However, marshalling our spearhead around the territory of Yugoslavia necessarily means abandoning West Germany – this is why we need to have our “Baltic Wall” in place (to defend our back-line territories) when we choose to make this move.

    So when is the right time to do this? Well, if we place in Poland on round 2, we could conceivably vacate West Germany at the same time, but chances are, we won’t have the Balkans pacified that early (although it depends on what NATO does.) As mentioned before, it will take until round 3 (at the earliest) for Reserve Group A to be redeployed to Yugoslavia, so it might be wise to time it to coincide with that action (assuming that’s even what we’ll end up doing.) It also probably makes sense to not abandon West Germany until we’re in a position to take territory that can replace the income we’d be losing from such a move.

    As a side note, I think it’s probably worthwhile to still place 4 infantry in West Germany, on the turn that you choose to abandon it. This is probably enough defense to keep WE from being able to liberate the territory, meaning that even if another NATO partner does so, they at least won’t receive any income from it.

    At this point, we have to make another major decision: where to attack. It might seem the obvious answer is that we’re going to invade Italy; not necessarily. Since the US will be able to set up their shuck-shuck into France, the responsibility for defending Italy falls to the Europeans. If they’re focusing their defensive capabilities here (and not spreading token forces out to Norway or Indochina, for example) Italy can still be a tough nut to crack. The alternative? Switzerland.

    If we have set up our supply lines (along the Baltic Wall) we should be funneling troops from Karelia, through Poland, Yugoslavia, and then into the Swiss Alps – while securely defending our back-line territories, and keeping NATO out of the Balkans. What taking Switzerland does, is allow us another centralized “keystone” territory, from which we now threaten both Italy and France; since we’re using exclusively armor in Europe (rather than air power) we don’t have to worry about the inability to land aircraft in Switzerland, once we capture it. This forces NATO to make the decision of whether to keep their forces split (allowing our single, unified force to potentially crush one of theirs) or, to rally in a single territory (likely France) and let us simply walk into the other (in that case, Italy.)

    Obviously, taking either territory would be a huge coup; Italy in particular (I feel) allows us an excellent staging point from which to secure our back lines, and shore up our position for the continued offensive towards WE’s capitol. Unlike West Germany, it has a factory, so if our income is high enough (once we’ve captured India) Italy can start producing tanks, right on the front lines.

    Also worth noting, is that by putting so much pressure on India, we’ve likely kept the British out of Europe – whether that be in Norway, France, the Baltic, or the Mediterranean. This should have the net effect of making this Europe strategy more likely to succeed. The India-focus might also weaken the US presence in Europe, particularly if they decide to shore up southeast Asia, while also trying to push into North Korea or Siberia.

    Plan B?
    Now, I feel that there is also a distinct alternative to this execution, which circumvents the necessity for the “Baltic Wall.” If the USSR controls Sweden, then NATO cannot cross the strait into the Baltic Sea (even if NATO is in control of West Germany.) However, this ultimately implies a strategy of making Norway the main focus (rather than Italy or France) which I think it shouldn’t be. Taking over Sweden allows you to abandon West Germany (i.e. in favour of Switzerland or Yugoslavia) but if you have been committing forces to Scandinavia instead of central Europe… what’s even the point?

    I do think that once the India front has been subdued, you can look into purchasing a couple of heavy armor units in Karelia, to sweep through Scandinavia. But, I feel that this should only be done once the “Baltic Wall” has been well-established, and you can afford to supplement the coastal defense of Karelia with infantry drawn from Belarus or Orel (places where you otherwise would never bother placing units) once you have the income to do so.


  • Operation Underbelly (Part 6)

    War in the East

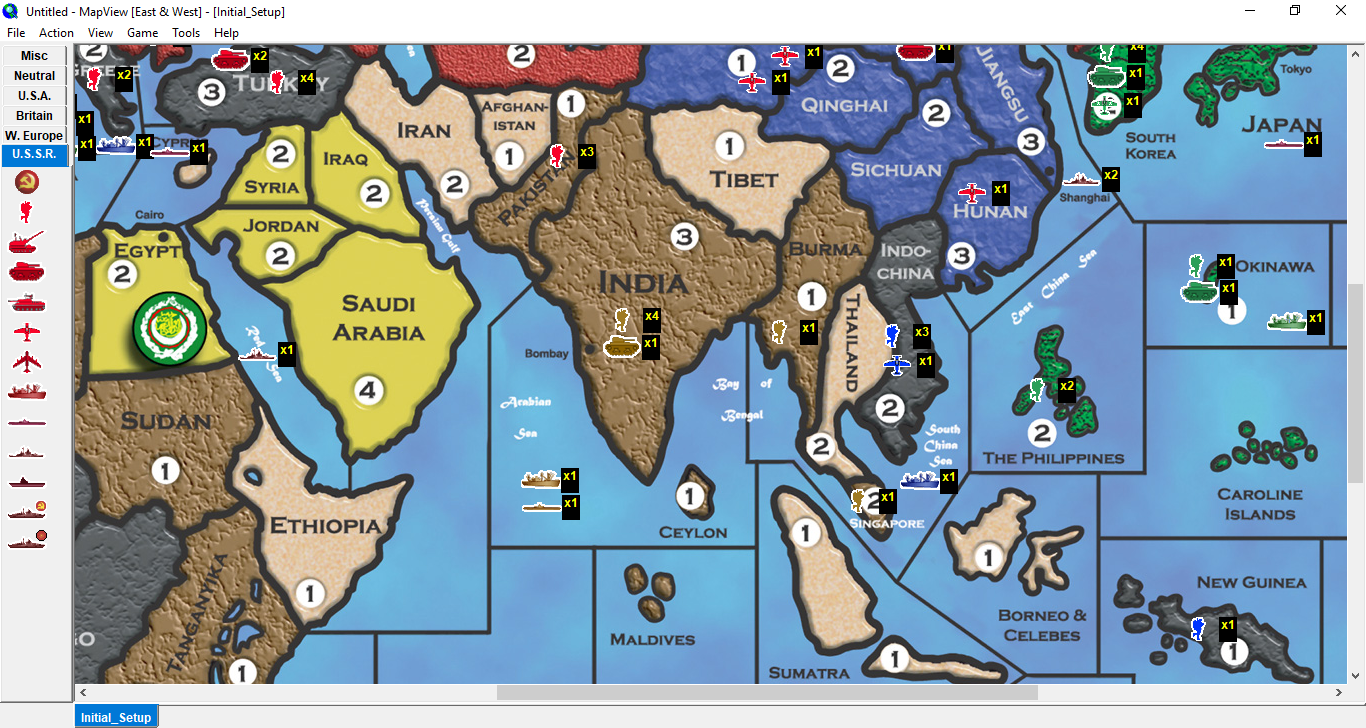
    9492fea5-41af-4126-b39b-c557625edafa-image.png

    (Approximate setup, after the 1st Soviet turn.)

    As is fairly clearly illustrated by just the basic geography of the map, the key to the USSR’s eastern territories is Eastern Siberia (which I often shorten to just “East Siberia.”) It starts with a factory and an AA gun, making it a fairly easily defensible territory, and is another one of those “keystone states” that serves as a gateway to other back-line territories. This happens to be the theatre where the most powerful NATO ally (the USA) can project the most offensive force, and so it can’t be neglected by the Soviets.

    Now, for those unfamiliar with the game, E&W has a diplomacy system; without getting into it at too much depth, if China favours the USSR (as they do in the starting setup,) the Soviets can move their units through Chinese territories, and gain some extra income. China also grants the unique benefit of defending North Korea; 6 neutral infantry (maximum) can defend the territory, as long as the USSR controls it, at the start of their ‘Place Units’ phase. If killed, these 6 infantry are replenished on any subsequent Soviet turn in which these conditions are met. What this does, is it makes it harder for the US to move aggressively into Siberia via South Korea.

    The problem for the Soviets is that age-old problem for any land power who has to fight the allies: the shuck-shuck.

    The SZ at the top of the map borders both Alaska and Western Canada. This makes it a perfect spot for the US fleet to rally, and continually transport infantry into Kamchatka – placing in the Western US, and walking to Western Canada, much as they do in the Atlantic theatre. Once Kamchatka is secured, these ships can be moved to the East Siberia SZ, to amphibiously invade East Siberia itself.

    So what should the Soviet response be, within the paradigm of ‘Operation Underbelly’? Well, in other strategies, the USSR normally would take out South Korea straight away (albeit this usually requires extra infantry in North Korea on ‘round zero’ and still requires throwing everything you have at it.) This move is really only of any value, for the equipment it is able to destroy (the US fighter in particular, but the armor also.) As such, I think the Soviets should only really go after South Korea, if a similar such opportunity presents itself.

    As part of our strategy of defending our coastal territories, it makes sense to maximize our infantry placement every round on North Korea, East Siberia, and (if we still control it) Kamchatka. However, if the US is moving aggressively into the region, we need to marshal these troops in East Siberia, moving them to the territory every turn, to bolster our defense; we should retake Kamchatka and North Korea if we lose them, to prevent the US being able to place infantry in those territories on subsequent turns. If the US is being more passive, we might want to move our forces southward and take the Korean peninsula; I expect the US to place 2 infantry in South Korea every turn, since they have the economy to do so, even if they don’t have the equipment available to make a breakout from that position. The sooner we take out their ability to place (and freely land) additional troops there, the better it is for us in the long run – potentially saving us the pain of having to liberate North Korea.

    The next question is, what forces can we commit to the area? As in the European theatre, round 3 is sort of the pivotal turn; we should be able to take India on this turn (allowing us to reposition our offensive units) as well as start spending on new equipment. Depending on what the allies are doing (and assuming we have been setting up supporting infantry in the lead up) I think the Soviets should place 2 heavy tanks on either East Siberia or Karelia, on round 3. The reason for heavy armor is because by deploying so close to the front lines, we can utilize their movement; from East Siberia, it allows a “two steps forward, one step back”-maneuver (attacking South Korea and moving back to North Korea) and from Norway (once captured) it allows a similar move – attacking Sweden, and then moving back to Karelia.

    If the British have been sending paratroopers to reinforce Norway, then this will likely continue to build up. As such, we need to eliminate this threat, by capturing the territory as soon as possible. However, since the US can set up their shuck-shuck into Kamchatka as early as round 2, this theatre potentially deserves even greater consideration. Because our starting units are tied down with the India attack until round 3, it won’t be until round 4 when we can start repositioning them to face the US landings in the east. And, even if the landings haven’t happened, it might be worthwhile to place the tanks in East Siberia anyway, to simply steamroll South Korea on round 4 (if we’ve moved in enough infantry to support such an attack.)

    (to be continued…)


  • (Part 6, continued)

    Avengers, Assemble: Repositioning, and Repelling the Invasion
    The next thing that we need to think about is how to redistribute our offensive equipment, in order to help maintain the gains that we’ve made, as well as defend our existing borders. Since most of our equipment is pointed at India, let’s start there.

    What we need to take into consideration, is a potential UK shuck-shuck from Africa into Pakistan. With Armor Group C being committed to the India attack, my initial thought would be to keep this force in Burma, so that they’re in a position to counter any landings into the valuable territories of Indochina or India, and reposition back to Burma. However, a viable convoy route into Pakistan throws a wrench into this whole idea; probably units that are more mobile will be needed to deal with this threat. As such, though it will be a slow process, it probably makes sense to reposition Armor Group C back to East Siberia, where it effectively only needs to counter-attack its adjacent territories. It also will be quicker than trying to send them to the frontline in Europe; probably once India falls on round 3, these units should start moving out, and mopping up Burma and Indochina should be left to other forces.

    With that thinking in mind, Reserve Group A should probably be moved towards Europe, and should just skip India entirely. (This assumes you don’t attack Iran, which is likely a bad idea anyway, in the case that the UK is able to set up their shuck-shuck from Africa.) The limited mobility of regular armor probably makes them a bad choice for trying to take Sweden, but if you’re just looking to neutralize Norway, they can come in handy once moved to Karelia. In that case, you’ll want to move them on towards central Europe afterwards (or just send them there straight away, ignoring Norway.) We could potentially move Reserve Group A towards East Siberia (further bolstering our counter-attacking force) but I feel like tying down so much offense in a theatre where we can’t make any real gains, is a bit of a waste. It probably makes more sense to send over fighters (which also boost our defense) since they can be repositioned more quickly, if no longer needed.

    If we go with the “Strong India” positioning for our fighters, we essentially end up with two air wings consisting of three fighters each, and a third consisting of one fighter; for the sake of brevity, let’s assume this lone fighter is lost in a naval battle, leaving us with just two equally-sized groups: A and C. On round 3, probably both groups should start in Sinkiang or Pakistan; this means they only need to move 1 space to attack India, and can then move 3 spaces on non-combat.

    To counter the American presence, what I think we should do is to move Air Group A to Manchuria. This gives us the positioning to hit either South Korea or Kamchatka, and reposition back to Manchuria or East Siberia – while still being able to reach Burma or Indochina, if needed there instead. On round 4, our starting infantry from East Siberia and North Korea can attack Indochina, with our remaining infantry from the India attack moving into Burma, to close the pocket. To support this, I propose moving Air Group C to Sichuan, on non-combat in round 3. Ultimately, once securing our control, I think we’ll want to position these fighters in India, so that we can counter-attack any surrounding areas (Pakistan, Burma, Indochina, and the adjacent sea zones) while still having the range to return to India, for defense. If Air Group A does end up being used to support attacks into Burma or Indochina on round 4, then Air Group C can be non-combat moved up to Manchuria to take their place.

    Having 3 fighters in each theatre means that we have 1 for each territory we’ll potentially need to counter-attack: Kamchatka, North Korea, and South Korea from East Siberia; Pakistan, Burma, and Indochina from India. This is mostly a cosmetic consideration, though; we can’t counter-attack South Korea without having forces in North Korea, and we can’t counter-attack Indochina without having forces in Burma. So we’ll never be able to split our air forces evenly, anyway. Really, what the focus should be, is in ensuring you have sufficient amounts of equipment in both theatres, to repel invasion; this might mean building heavy armor in East Siberia, and shifting your entire air force towards the India theatre. It’s just a matter of reacting to what your opponent is doing.

    d63fd879-fd00-45d0-87ba-d7bd717b3a14-image.png
    (Round-trip fighter ranges from India, East Siberia; shown in red)

    If we’re worried about being hit by the EMP effect of a nuke, we can move these fighters (earmarked for India) to either Sichuan or Sinkiang, and still be able to cover the same land territories; Pakistan and India being 1 space from Sinkiang and 3 spaces from Sichuan, with Burma and Indochina being 1 space from Sichuan and 3 spaces from Sinkiang – meaning we can rock our aircraft back and forth over these areas, while always landing them in China. Likewise, we’ll want to keep Air Group A in East Siberia whenever possible (for defense) but move them to Manchuria to avoid the nuke.

    So what’s left?
    Reserve Group B: I think I prefer having the bomber stationed in Kazakhstan, since this allows it to cover our entire empire, and most of our coastlines. You can move it to Moscow, if you want to be a little closer to the Atlantic (and assuming you plan to add ships in the area.) Otherwise, look for places you can spring surprises, with paratroopers: from Yugoslavia, Turkey, or Pakistan you can potentially reach Africa; from Karelia you can reach Iceland or Greenland (potentially setting up a move into North America); from North Korea you can reach Okinawa, the Philippines, or even Japan – potentially island-hopping your way to Australia; from East Siberia, you can reach Alaska or Western Canada (potentially with fighter support, based in Kamchatka.) Try and use your bomber creatively, to throw off your opponent, and make them defend territories they otherwise wouldn’t.

    As an aside, this is one of the tactics that NATO uses effectively (and easily) against the USSR, forcing them to leave “picket forces” in back-line territories (mostly in Europe) that are of no real value, beyond their IPCs. I think there’s a strong case to be made that since paratroopers so disproportionately favour NATO, they should be house-ruled out of the game – or at the very least, bombers should only be allowed to transport infantry on non-combat, keeping in spirit with the game’s setting, of the “Berlin Airlift.”

    Reserve Group C: Since I think this heavy tank should be used against India during the round 2 strafe, it will end up in Sinkiang at the end of that turn. If it is kept out of the India attack on round 3, it can instead be repositioned to North Korea, thus supporting Air Group A (plus any heavy armor placed in East Siberia on the same round) for attacks on round 4. Otherwise, it can be kept in the India theatre for as long as desired, potentially turning towards Siberia once southeast Asia has been subjugated.

    Alternately, Reserve Group C could be moved towards Scandinavia, but this would mean stopping in Komi or Orel (neither of which I like) on round 3, to attack Norway and move back to Karelia on round 4. The other way to do it would be to move to Moscow, Georgia, or Ukraine, and attack Norway without being able to move back (which I also don’t like.) Probably if we’re moving this group to Europe, it should just go straight to the main front; Ukraine on round 3, and Switzerland on round 4.

    (Edit)
    After some thinking, the better alternative to the suggestions above, would be to use Reserve Group C in the round 3 attack on India, and then reposition in one of the following ways:
    a) Inner Mongolia: allows for a round 4 attack on Burma or Indochina, but can also be sent to South Korea (albeit stranding itself in the process) joining ranks with new heavy tanks placed in East Siberia on round 3
    b) Kazakhstan: allows for moving to Karelia on round 4 (possibly coinciding with placing new heavy tanks there on the same round) for a round 5 attack on Sweden; alternatively, move to Poland or Romania on round 4, attacking Italy on round 5
    (/Edit)

    (next post will touch a bit on mopping up in southeast Asia.)


  • The Underbelly of the Beast: Why Invading Neutrals is a Bad Idea

    c4587e84-d28f-4164-af44-3ce6dc471090-image.png

    On round 3, our main force should capture India; on round 4, the infantry remaining from this attack can move into Burma. At the same time, the infantry that we moved from East Siberia and North Korea on round 1 will be able to march into Indochina. So what should we do next?

    It might be tempting to invade Thailand for the extra income, but that “breaks the seal” on Singapore; if we leave Thailand neutral, it forces the British to commit a transport in order to move any units from Singapore into combat – which means one transport that can’t be used somewhere else. We also need to consider the threat of US amphibious forces. If we take Thailand, it just makes for 1 more territory that we have to defend from invasion, when what we really want to do is minimize our number of vulnerable coastal territories as much as possible.

    The same is true of Iran. As I’ve said in the past, it can be a useful corridor for marshalling tanks from Asia into Europe, but if the UK has a strong transport fleet in the area, it opens up a backdoor into Turkey. We want this area to be “closed for business,” so it is better to keep Iran neutral, and thus keep NATO forces out.

    That all being said, once everything is locked down (end of round 4) we can potentially look at invading Afghanistan and Tibet, to boost our economy a little bit. Neither territory is subject to naval invasion (and both have fairly weak armies) so the only concern is the threat of paratroopers – keep the ranges of any NATO bombers in mind, when deciding whether or not to leave infantry in either of these territories. In order to make sure we secure this southern coastal region, we’ll want to continue producing infantry in Kazakhstan and Turkmenistan (and possibly Mongolia) on round 2; they won’t be in range to participate in the attacks on India, but they will be able to help secure the territory on round 4, so that our attacking forces can push further forward.

    Our garrison forces should be primarily based out of India, meaning Indochina is the furthest conquered territory from that powerbase. This is what makes it a desirable target for the US; if we aren’t in a position to counter-attack a US landing into Indochina, then they can start to build up forces there, over time. So we’ll need to be moving infantry from India to Burma on a regular basis, to make sure we can outmatch any potential incursions.

    Industrial Complex?
    I’ve wondered if it would be worthwhile to put an IC into India. If you’re able to put down some transports, you can begin your own shuck-shuck into Africa (by invading Ethiopia) but this assumes the US Pacific fleet and the combined NATO Mediterranean fleet will allow your transports to live that long. Since there’s already an IC in Ukraine, it probably makes more sense to build up a fleet in the Black Sea (with the added protection of the Turkish straits) for such purposes. Even then, it would require a very high Soviet economy, which would probably mean NATO is not far from surrendering anyway.

    Oil Rush?
    On a similar note, I’ve seen strategies that involve the Soviets invading the Arab League, for a couple reasons. Generally, it’s because neutral forces are far weaker, compared to those of the main combatants, who’ve had a couple of rounds to build up. This makes them easier to attack than a large NATO garrison in France, for example. The other reason is that (obviously) this provides a big economic boost; the problem is that (if it’s a land assault only) the Soviets will be limited in where there can attack. This effectively gives NATO its own boost in economy, until the rest of the territories can be captured by the Soviets.

    So while this does give you a gateway into Africa, it also increases the length of coastline which NATO can potentially assault. Depending on NATO’s transport and supply position, you may find the US wading ashore in the Arab states from both directions, as well as WE and UK pushing back hard. Where I’ve had success with this strategy, is by combining conventional attacks into Syria and Iraq, with nuclear strikes against Saudi Arabia and Egypt on the same turn. So, overall I feel like this is only really feasible as a late-game tactic.


  • War in the North

    This post is basically going to be an amalgam of all the possible moves you can make, in order to secure Norway and Sweden; I keep trying to downplay the importance of this theatre, but my mind keeps wanting to hammer out the execution of such moves, so here we go.

    As said before, this theatre should be a priority if the enemy begins committing forces to it. The other reason to attack Sweden is to close off the strait; you might want to do this if NATO liberates West Germany, and your “Baltic Wall” is in some way deficient (or insufficient to repel invasions.)

    So what should we be looking for? As I’ve said before, the UK probably wants any transports it is using in the Atlantic to convene in the Irish SZ. This is because it’s the SZ from which the US can shuck-shuck into France, and so it just makes sense for NATO to concentrate their naval forces in one zone, instead of two (the 2nd being either the North Sea, or the Komi SZ.) Generally if Norway ends up being reinforced, it’s done by WE placing new infantry there, or the UK landing paratroopers.

    Keep an eye out for:

    • UK bombers rallying in the home island, for further paradrops
    • UK (and potentially WE) transports in the North Sea
    • US transports in the Komi SZ (to pick up infantry from Iceland)

    Any of these are signs that the Allies want to try and open a new front in the North. Luckily, we can afford to be reactive in this theatre; gauge your opponents actions, and then decide if you should commit forces.

    Reserve Group A (armor): Starting in Turkey, I’ve mentioned that you can kind of hedge your bets, and move to Ukraine on round 2 (allowing redeployment to either Karelia or Yugoslavia on round 3, depending on where you want to exert force.) You can also potentially move only as far as Georgia, if you’re sure you want to commit to the north, but also want the tanks in range to counter-attack Turkey if needed; this of course will work best if you committed your “flex” infantry on round 1 to placing in Georgia.

    Armor Group B (Balkans): You can use these forces to pacify any landings in Yugoslavia or Greece on round 2, likely rallying in Yugoslavia on non-combat, with infantry coming down from Poland. What you can then do, is split off the heavy armor from this group, reassigning them to Karelia on round 3, while keeping your regular tanks in Yugoslavia (or West Germany.)

    “Baltic Wall”: So with infantry moving from Karelia down the Baltic coast, your wall should be set up at the end of the Soviet non-combat movement phase, in round 3. This means that infantry placed in Karelia on or after round 3 can be committed to attacks in Scandinavia, without compromising the wall – so long as we continue to feed our frontline with reinforcements from other territories, such as Poland or Romania. As mentioned before, we’ll want to be maxing out our infantry placement on West Germany, Yugoslavia, and Greece, on any rounds which we control them at the start of our turn.

    As you can see, this is all lining up for an assault on Norway in round 4. However, if we want to supplement our northern offensive with new heavy tanks placed in Karelia, we will want to have extra infantry to cover the territory defensively. What this effectively means is that whatever turn we plan to place armor in Karelia, we need to place infantry in Orel, 2 turns prior to that. If we start placing infantry in Orel on round 2, they will reach Karelia (via Komi) on round 4.

    Note: By taking Norway, NATO bombers based in France or the UK no longer have a safe landing space, if they were wanting to drop paratroopers into Orel. Therefore, once we take Norway, we no longer need infantry in this territory for deterrence.

    If we are planning to place heavy armor in East Siberia on round 3 (to take out South Korea) then the earliest we would want to place in Karelia would be round 4. Like I said, we can speed this up to react to our opponent (potentially ignoring South Korea to do so.) On the other hand…

    Reserve Group C (cavalry): If we use this heavy armor to attack India on both rounds 2 and 3, we can reposition it to Karelia on round 4. We might want to consider having our placement of new tanks in Karelia line up with this. By doing so, we have 3 heavy tanks that can potentially move through Norway to attack Sweden (on round 5) in addition to whatever forces we want to reuse from our Norway attack.

    Conclusions:
    Overall, I think the best option is to wait until round 5 to attack Norway (with the earliest we could attack probably being in round 4.) This allows us an extra round to have Armor Group B able to mop up any shenanigans in the Balkans, as well as an extra round for Reserve Group A to be able to counter-attack Turkey, and still reposition. This also allows us to delay placing new tanks in Karelia until round 5 (to be used on Sweden in round 6) giving us a “breather” in round 4, with which to make sure we place enough infantry on all of our borders (after having deployed new armor in East Siberia, on round 3.) We can speed up the deployment by starting to place in Orel as early as round 2, but if we’re attacking on round 5, it can wait a bit. We can also beef up the attack by committing one of our air groups to the front, once India falls (taking it away from either the India theatre or East Siberia.)


  • War in the North
    Part 2: Speeding up the Timeline

    Operation Underbelly - Europe.png

    This depiction assumes your 3 “flex” infantry were placed in Georgia.

    I’ve been giving some more thought to the proposed attack on Norway (and into Sweden) and here’s what I’ve figured out:

    1. This move likely won’t work if you have to counter-attack Greece on round 2
    2. You need to place some “flex” infantry in Orel, on round 1
    3. You need to be able to place 3 infantry in Poland on round 2 (thus speeding up the “Baltic Wall” tactic)

    If you’re unable to do these things, then I would avoid this “accelerated” attack in the north. As you can see on the map, the proposed moves on round 1 leave you with 2 heavy tanks in Romania. These will be used as the main offensive units for this action, which is why the situation of a strong NATO landing into Greece on round 1 has the ability to derail this maneuver, as these tanks will be needed for that counter-attack instead.

    On round 2, whatever infantry you gathered in Komi must move to Karelia to support the attack on Norway. This is why we need infantry in Orel on round 1, so that we can move them to Komi on round 2 (replacing those units moved up, for the attack.) Also on round 2, we’ll want to move our heavy tanks from Romania to Karelia; this culminates in an attack on Norway in round 3.

    Technically, you can still counter-attack Greece, and then non-combat move to Poland, keeping your heavy tanks in range of Norway, but leaving them stranded there when they do attack. We want to set them up such that they can withdraw back to Karelia after taking Norway. On the other hand, if they can be provided with enough covering infantry in Norway, then they can attack Sweden on the following turn(s), and be repositioned to Karelia after, which would also be ideal.

    The reason we want to complete the Baltic Wall early, is so that the Norway attack can coincide with our move out of West Germany and into Switzerland. This might not be a necessary move, so I’ll explain the thinking behind it. Essentially what we want to do is bait NATO into moving their navy into the Baltic Sea, as well as to land their bombers in Norway, so that we can trap the former and destroy the latter.

    On round 2, we should be able to place 31 infantry; here’s how I would suggest spreading those around:

    West Germany: 4 inf
    Poland: 3 inf
    [Balkans]: 4 inf
    Karelia: 4 inf
    Georgia: 3 inf
    Kazakhstan: 2 inf
    Turkmenistan: 2 inf
    [Pakistan if controlled, otherwise Mongolia]: 1 inf
    East Siberia: 4 inf
    Kamchatka: 2 inf
    North Korea: 2 inf

    If we do this, and we move our infantry out of Orel on the same round, this leaves that territory undefended. Orel is in range of paratroopers from both France and the UK (where NATO bombers could reasonably expect to be stationed) but only if those bombers fly over the AA gun in Karelia, to land in Norway. This is an excellent situation for us, if we are in a position to attack Norway on round 3. If we keep our reserves nearby on round 2, then we are also well-positioned to counter-attack Orel, with infantry drawn from surrounding territories (primarily Georgia) and without needing to pull tanks away from our main frontline in Europe. Our heavy tanks in Romania (if not used against Greece or Yugoslavia) can also hit Orel on round 2, and end their movement in Karelia.

    Now, if we abandon West Germany on round 3, that means NATO can capture the territory (thus re-opening the strait to them) on the same round. If this is done on the WE or UK turn, then potentially UK and US ships can move into the Baltic on the same round. If we retake West Germany in force on round 4, we can trap these ships in the Baltic Sea. As such, we want to be in a position to take Sweden, closing the trap for good, and allowing us to permanently withdraw from West Germany. To facilitate this, we’ll want to place heavy tanks in Karelia on round 3. The placement of these units will be covered by infantry placed in Orel on round 1, moving to Komi on round 2, and then Karelia on round 3. Our combined heavy tank force (potentially including Reserve Group C) can simply move through Norway, to attack Sweden as early as round 4; they can either stay put, or move to Norway on non-combat (if we can get enough infantry fodder to Norway at the same time.)

    This means that deployment of heavy armor to East Siberia will be delayed until round 4 or (I would recommend) round 5. Ultimately, South Korea is not much of a prize; we mainly want to concern ourselves with keeping North Korea under Soviet control. We also have to decide early on whether to commit our reserves to this northern initiative, so pay attention to the result of other battles, and be mindful of the global situation at all times; whichever reserves we commit to this plan will miss out on one (or both) of our attacks against India.

    Reserve Group A can be moved to Kazakhstan or Ukraine, and still effectively counter-attack Orel; it just depends if we want them to commit them long-term to Europe or to Asia. If they attack Orel from Ukraine, they can be moved to Karelia for a follow-up attack on Norway, if needed. Likewise, Reserve Group C can strafe India on round 2 (ending in Sinkiang) and still hit Orel on round 3, but with no movement left to reposition. Ultimately, it’s a matter of balancing out the amount of force to apply to each theatre, and where you want to commit your units long-term.


  • @the-janus

    Is this game still around? I haven’t seen it or The Great War in over a decade. I thought the Imp killed off his site.


  • @jwlbigdog They did, but some people still play them.


  • @imperious-leader I’m guessing in person? The Mapview apps for them hasn’t been compatible on any platform I own in a while.


  • @jwlbigdog
    Sorry for the late reply – I got distracted by something shiny ;)
    Hopefully you see this, and shoot me a reply.

    Are you still playing the game locally or anything? Got any war stories to share? I sent you a direct chat as well, we can talk in there if you’d prefer.


  • @the-janus
    I haven’t, but I still have the map sans pieces. I really wish Imp had made a TGW map. Apparently one of the A&A offshoots made a WW1 game, but it is already out of print and several hundred dollars now. Maybe someone can get Imp out of retirement long enough to put his stuff on a Steam platform. He could bundle EW/TGW/ Crucible all together and make a killing these days.


  • @jwlbigdog I tried to get him “out of retirement” so to speak; around the time I started this thread, I actually got ahold of one of the guys mentioned in the instruction book, who passed along an email to Imp – but I never got a response back :(

    I’ve got a version of MapView working on my Windows 10 rig right now, so I can look at the starting setup. But without a registration key, I can’t save games.


  • @the-janus If you were to get permission from Imp, I could remove the registration check from MapView for that module.


  • @motdc Against my typical M.O. I’ve fired off another email to Imp and Co. I’ll post here as soon as I hear anything back.


  • @the-janus sorry to require that, but the copyright laws are pretty strict in this scenario. I could be sued if I were enabled that work to be distributed without consent given the original agreement Imp and I had.

    Game rules concepts and mechanics, on the other hand, are not covered so if someone got desperate they could whip up an alternate artwork map and be able to play using that.

Suggested Topics

  • 1
  • 21
  • 6
  • 15
  • 1
  • 41
  • 10
  • 61
Axis & Allies Boardgaming Custom Painted Miniatures

134

Online

17.4k

Users

40.0k

Topics

1.7m

Posts