Step 3. Resize
This is the most trial-and-error step, especially for vehicles or units with odd poses or camera angles that have a different perspective (unit at sdie view VS at an angle). The goal is to resize the unit so it is consistantly sized to other units of its type.
All image programs have the ability to resize an image, though its surprisingly called a different things in different tools. (I recall having to hust around for it in Gimp).
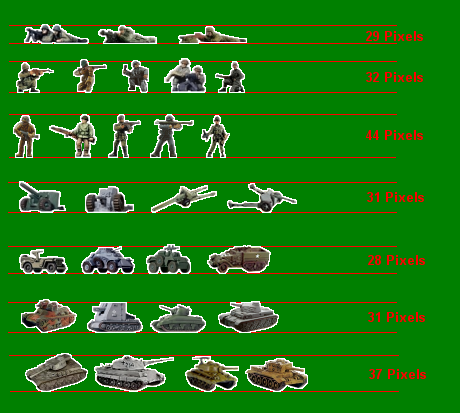
I have included a sample size chart. Not only does it help to give you an idea of how large to make your unit, it lets you see how it looks. After you apply a resize, copy-n-paste the unit right on to a scratch copy of the size chart to see how the unit stacks up.
After resizing the image to make the unit the appropriate size, you next need to change the image size to the standard size. In MapView, all of the images ned to be the same size, in the case of the A&A Minis modules I’ve decided to use a width of 80 pixels, and a height of 60 pixels. MapView masks out that extra unused space of small units. The changing of an image size without stretching/smooshing etc is ofetn referred to as setting the canvas size. You’ll want to set pure white as you background color when you resize the canvas (alternatively, you can use the flood-fill tool to fill in the newly created area with white). Also, try to center your unit in this 80x60 space. Just eyeball it as best you can.
A few things to note:
1. When you resize a unit, make him 2 pixels shorter than you intend to account for the border we will add later. So you can see in the chart that most soldiers are 44 pixels high. But you’d want to resize to 42 pixels high becasue we will add an extra pixel border later.
2. Tanks often have barrels, MGs, etc that stick up that will through off your resize efforts. The Chaffee image, for example, is actually almost as tall as a King Tiger if you measure to the MG on top. Instead, what I try to do is measure from the bottom of the tank tread to the top of the turret. This is usually around 28 pixels. So I’ll resize a similar tank and then measure to see if the resulting tread-to-turret is 28 pixels. I never get it right on the first try, so I hit undo and add or subtract from the resize hight and do it again.
3. Do take into account poses, and comparative sizes. A Tankette should not be as tall as a King Tiger, even if they are both tanks. Vehicles shot from a perspective-pose will need to be a bit taller to be visually the same. While a Sherman shot at profile will be 28 pixels high, one shot from a perspective angle will be 31 pixels high.
4. Sometimes protruding barrels etc make it such that when you resize the unit, its larger than 80x60. This was ftur of of the IS-2 and the King Tiger, as I recall. What do you do? I suggest trimming off the tip of the barrel a little before you resize. Its what I did.
5. All of these items are just guidelines, use your best judgement. At this point its better to get them done to 80% of what you’d want and get them into play. We can clean-up units later.


